What is release manager and how to manage multiple versions of applications/services that are deployed?
Release Manager is a code hosting and the version controlling and management application. It helps you work and manage multiple versions of the application/service or module.
The Release Manager application smartly allows you to cut a new child branch out of the master branch. Release Manager consists of a default master branch, which is called the “Development” branch. All the new branches are cut out of the “Development” branch. Therefore, you can change or fix the code in the new child branch and then merge back the child branch into the “Development” branch.
In the Release Manager application, you can create three types of child branches as follows:
➢ Hotfix branch
➢ Deployment branch
➢ Backup branch
The hot-fix and deployment categories are mainly used to fix and change the application code. After the code is fixed and changed, it is synced on the VRT. The backup category is used to take the backup of the code from the master branch. You can create new child branches from the master branch up to an “n” number of hierarchies.
Release Manager Features
The Release Manager application offers the following features:
➢ Release Management
This module allows you to:
- Deploy the branch
- Roll-back the branch
- Sync the changes of the hotfix/deployment branch
- Access the details of the branch
➢ Branch Management
This module allows you to:
-
Create a new branch from the default source branch
-
Access the details of a hot-fix branch, including
- Name of the hot-fix branch
- Type of the hot-fix branch
- Name of the source branch from which the hot-fix branch is created
- Deployment details
- Edit the details of the hot-fix branch
➢ Deployment History
This module allows you to:
- Access the deployment details on the basis of the type and the name of the environment
- Access the deployment details on the basis of the type and the name of the hot-fix branch
➢ View Sync Status
This module allows you to:
- View the sync status on the basis of the name of the environment
- View the sync status on the basis of the application module in which a component is synced or is pending to be synced
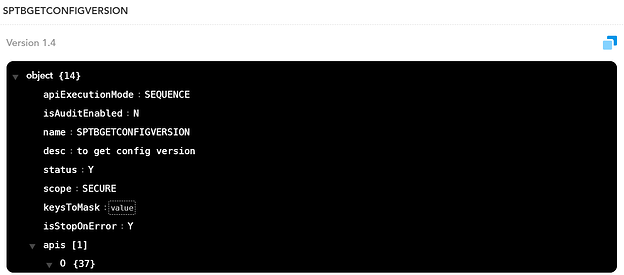
- View the configuration details of the synced component in JSON format
Release Manager Modules
1. Release Management
This feature allows you to perform several functions such as sync the changes, deploy or roll back the branch, view the details of the branch.
- Deploying a Branch
When you initiate the deployment of a branch, the branch is automatically deployed on VRT (Vahana Run Time). On the Vahana cloud platform, VRT is a component that allows you to allocate a virtual space to the newly created environment.
To deploy a branch on VRT:
-
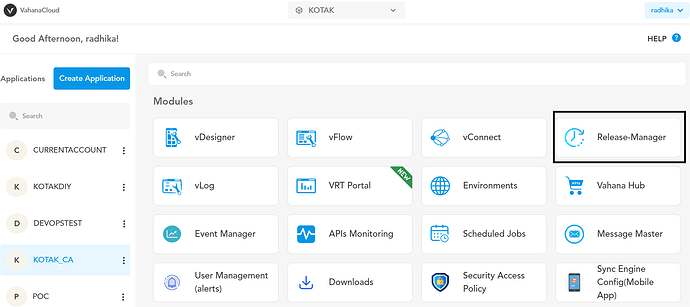
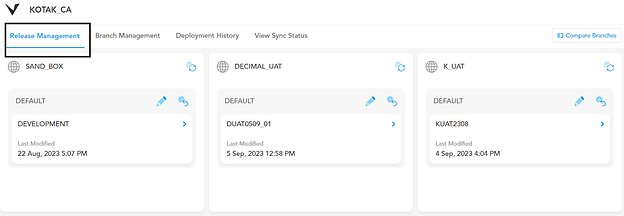
In the Release Manager application, click the Release Management tab, the application displays the environment details.
-
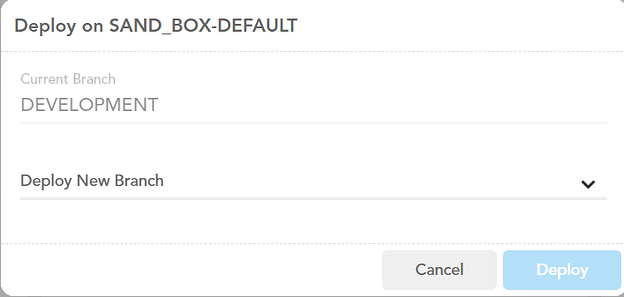
In the Default area, click the Deploy Branch icon (
 ), the dialog box opens.
-
In the dialog box, click the Deploy New Branch list, the application displays the list of the branches that are not deployed.
-
In the list, select the branch that you want to deploy.

-
After you select the branch, click Deploy, the branch is successfully deployed on VRT.

- Deployment Roll-back
This functionality allows you to roll back the deployment of the earlier deployed branch. You can roll back the deployed branch as a result of any of the following reasons:
➢ Erroneous code in the deployed branch or,
➢ After the branch is deployed, the deployed code halts the application’s function
To roll back the deployed branch:
- In the Release Manager application, click the
 Release Management tab, the application
displays the environment details.
- In the Default area, click the Rollback Branch
icon ( ![]() ), the dialog box opens.
), the dialog box opens.
3. The dialog box displays the following details:
| Box | Description |
|---|---|
| Current Branch | This box displays the name of the currently deployed branch. |
| Rollback To | This box displays the name of the branch that was deployed into the environment before the current branch is deployed. After you perform the rollback, the branch that the Rollback To box displays will be redeployed. |
- On the Rollback on dialog box, click Rollback, the application rolls back the currently deployed branch and then reverts the deployment to the last deployed branch.
- Syncing Changes
This feature allows you to sync the changes of the hot-fix or the deployment branch on VRT. Syncing the changes specifies that you are imparting the changes of the deployment branch/hot-fix branch to the Vahana Run Time environment.
After you update a module or rectify the application code of the module, it is necessary to sync the updated or rectified code with the code that is running on the Vahana Run Time environment.
To sync the changes:
-
In the Release Manager application, click the Release Management tab, the application displays the environment details.
-
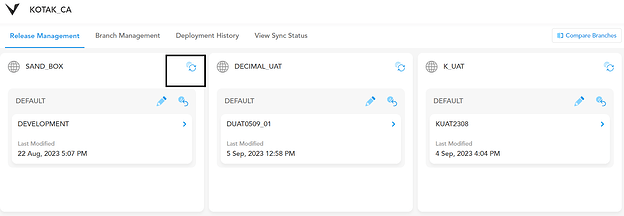
In the details of the environment, click the Sync icon shown below
- Accessing Branch Details
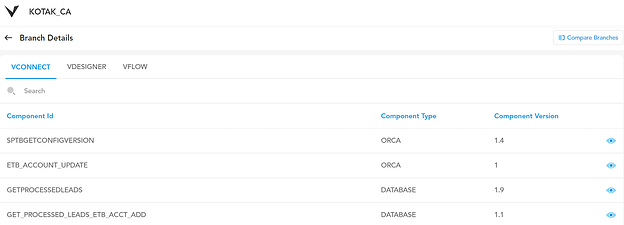
In the Release Management module, this feature allows you to access the details of the branch. The application displays the details of the branch at the component level as follows:
➢ List of components that you access in the hot-fix or deployment branch
➢ Type of component
➢ Version of the component
➢ A feature to access the configuration details of the component
After you cut a branch out of the master branch to access a component, the application maintains the details of the branch on the basis of the component ID. The component ID displays the name of the component that you access in the branch.
Suppose, you cut a branch to access the same component more than once. Each time you access the component, you impart changes in the component and then deploy it. In this case, the Release Management application will maintain the updated component with the incremental version number.
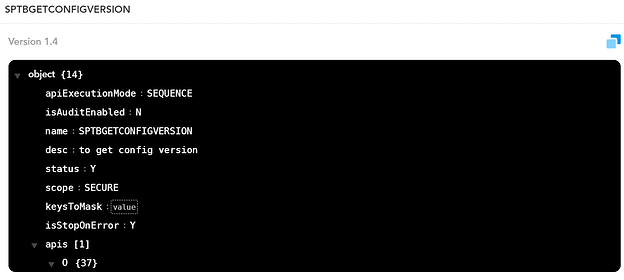
You can view the list of components application-wise. This feature also allows you to view the configuration details of the component in the JSON (Java Script Object Notation) format.
To access the branch details:
-
In the Release Manager application, click the Release Management tab, the application displays the environment details.
-
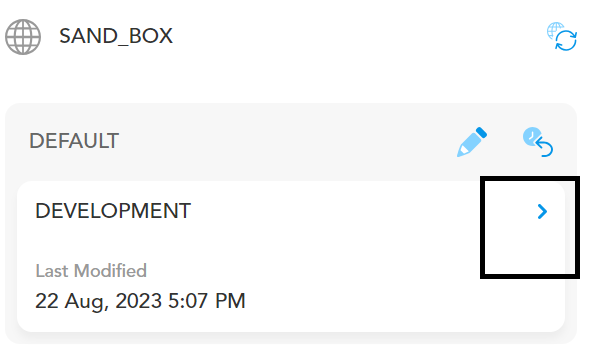
In the Default area, click the horizontal arrow icon , the Branch Details page opens.
-
The Branch Details page displays the list of components based on the application name and type.
-
Click the tab of the application name (For example: - vDesigner or vFlow), the application displays the list of the components that have been updated or fixed.
| Branch Detail | Description |
|---|---|
| Component ID | This column displays the name of the component that you access in the hot-fix or deployment branch. |
| Component Type | This column displays the type of the component that you access in the hot-fix branch. |
| Component Version | This column displays the version number of the component. |
| Eye Icon | If you click the eye icon , the application displays the configuration details of the component in the JSON format. |
- Comparing Branches
This feature allows you to compare two branches. While comparing two different branches, you can view
➢ The name of the component in the branch
➢ Version number of the component, etc.
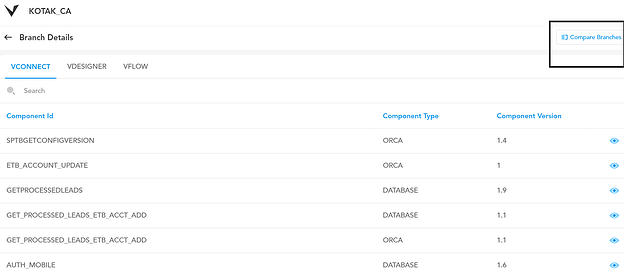
- In the Release Management application, locate the top-right area and then click Compare Branches, the Compare Branch page opens.
-
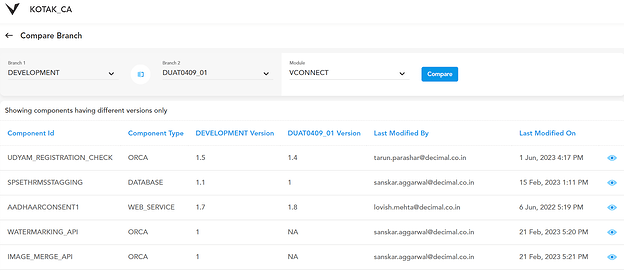
On the Compare Branch page:
➢ Click the Branch 1 list and then select the first branch (For example: - DEVELOPMENT) to compare.
➢ Click the Branch 2 list and then select the second branch (For example: - PROD_0203_1) to compare.
➢ Click the Module list and then select the application (For example: - vConnect).
-
After you select the branches and the application module, click Compare, the application displays the following details after it compares two branches:
➢ Name of the component under Component ID
➢ Type of component (For example:- Database)
➢ Version of the component in the first branch
➢ Version of the component in the second branch
- On the Compare Branch page, click the Show only differences check box, the application displays the list of the components that the Release Manager application maintains with multiple versions.
2. Branch Management
This feature allows you to create, manage, and edit the branches. In the Release Manager application, a branch is created out of the master branch. You create three types of branches from the master branch: Hotfix branch, Deployment branch, and backup branch. The backup is used to archive the application code. The deployment and hotfix branch are commonly created to access and update/fix the application code.
After the code is fixed, the hotfix or deployment branch is merged back into the master branch. You create, manage, and edit a child (hotfix, deployment) branch as follows:
- Creating a New Branch
This feature allows you to create a new branch. To create a new branch:
- In the Release Manager application, click the Branch Management tab.
-
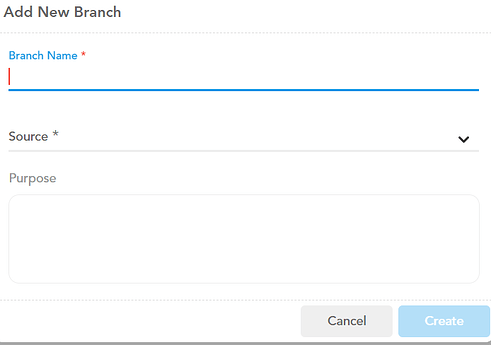
Click Add Branch, the Add New Branch dialog box opens.
-
On the Add New Branch dialog box, perform the following functions:
| Box/List | Description |
|---|---|
| Branch Name | In this box, enter the name of the branch (For example: - Test3). |
| Type | In this box, select a category or type for the branch as follows: |
| Source | Click this list and then select the source branch from which you want to create a new branch. |
| Purpose | In this box, enter the brief purpose to create the new branch. |
- After you enter or select the data to create a new branch, click Create, the new branch is created.
- Editing a Branch
To edit a branch:
- In the Release Manager application, click the Branch Management tab, the application displays the list of the existing child branches.
-
Locate the name of the branch (For example: - Test1) that you want to edit.
-
Place the mouse pointer on the name of the branch, the Edit link appears.
-
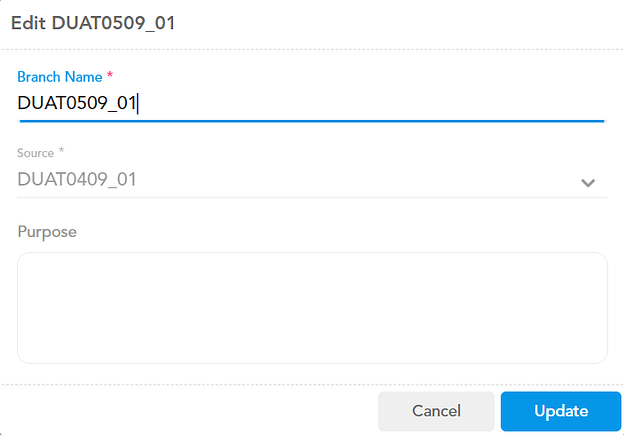
Move the mouse pointer in the same row and then click Edit, the Edit dialog box opens.
-
In the dialog box:
➢ Click in the Branch Name box and then change the name of the branch.
➢ Click in the Purpose box and then change the purpose of the branch (If required).
- After you edit the name and the purpose of the branch, click Update, the branch is successfully edited.
- Deleting a Branch
This feature allows you to delete a branch. You can only delete a non-master branch. The application does not allow you to delete the master branch. In the Release Manager application, a non-master branch can be a hot-fix, deployment, or backup branch that is created from the master branch.
To delete a branch:
- In the Release Manager application, click the Branch Management tab, the application displays the list of the existing child branches.
-
In the list of branches, locate the name of the branch (For example: - Test3) that you want to delete.
-
Place the mouse pointer on the name of the branch, the Delete link appears.
-
Move the mouse pointer in the same row and then click Delete, a message box opens and displays the message: Are you sure you want to delete this branch?
-
On the message box, click OK, the branch is deleted.
- Viewing Branch Details
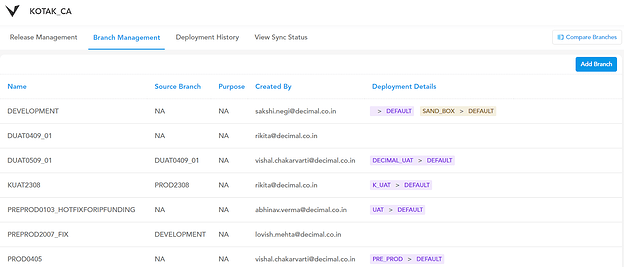
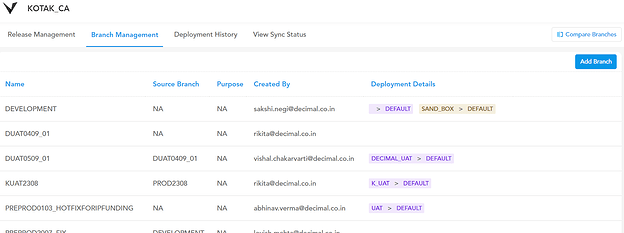
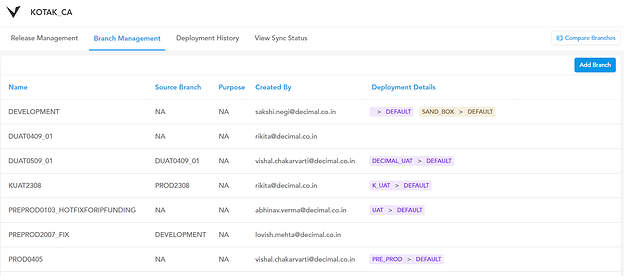
After you access the “Branch Management” module, the Release Manager application displays the details of the branches that have been created earlier.
To view the details of the branch:
- In the Release Manager application, click the Branch Management tab, the application displays the details of the earlier created branches.
- The details of the branch include:
| Branch related Data | Description |
|---|---|
| Name | This field displays the name of the branch. The Release Manager consists of a default master branch, which is called the “Development” branch. When you create other non-master branches, you can define the name of the new branch. |
| Type | This field displays the following types of the branches: Deployment, Backup, Hotfix |
| Source Branch | This field displays the name of the branch from which the new branch is cut. You can cut the new branch from the master branch or from other non-master branch that you created earlier. |
| Purpose | This field displays the purpose of creating the new branch. |
| Created By | This field displays the name of the user who has created the branch. |
| Deployment Details | This field displays the deployment path that specifies the location where the application module/service is deployed. The deployment path contains the name of the environment where the application module is deployed. |
3. Deployment History
This module allows you to access and view the details of the deployment.
- Name of the branch that is deployed
- Name of the environment where a branch is deployed
- The date and time at which a branch is deployed
- Registered email ID of the user who has deployed the branch
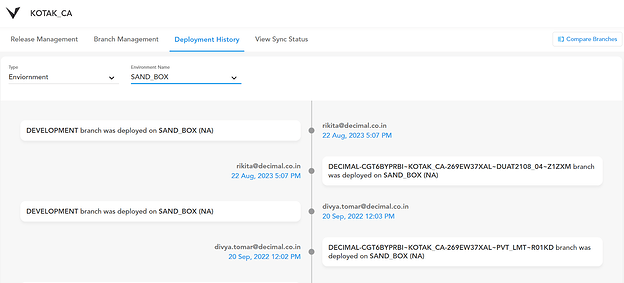
Each time you deploy a branch into a specific environment, the Release Manager captures the deployment details and then helps you access them by using the “Deployment History” feature. This feature helps you access the deployment history on the basis of the two following criteria:
- Name of environment
- Name of branch
To access the deployment history:
- In the Release Manager application, click the Deployment History tab, the Release Manager application displays the following lists:
| List | Description |
|---|---|
| Type | After you click this list, it displays the following options: Environment, Branch |
| Environment Name | The application displays this list if you select Environment in the Type list. In the Environment Name list, select an environment to view the deployment history on the basis of that selected environment. |
| Branch Name | The application displays this list if you select Branch in the Type list. In the Branch Name list, select a branch to view the deployment history on the basis of that selected branch. |
-
After you select an environment or a branch, the Release Manager application displays the details of the deployment as follows:
➢ Name of the environment
➢ Name of the branch
➢ The date and time at which a branch is deployed
➢ Registered email ID of the user who has deployed the branch
4. Viewing Sync Status
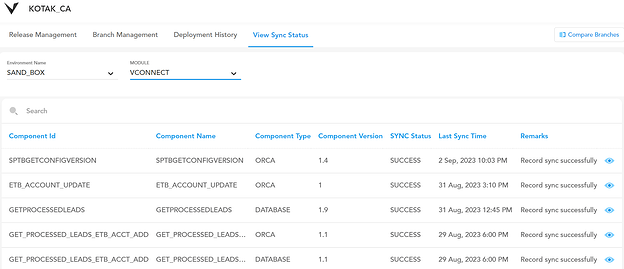
This feature allows you to view the current status of the “Sync” activity for the specific service or application module. The “Sync” activity can have any of the two statuses: Pending or Success. The “Pending” status means that the changes that you incorporate into the application module in the respective branch are yet to be synced on VRT. The “Success” status means that the changes that you incorporate into the application module have been successfully synced on VRT.
To view the sync status for the specific module:
-
In the Release Manager application, click the View Sync Status tab, the application displays the following lists:
➢ Environment Name
➢ Module
- In the lists, perform the following functions:
| List | Description |
|---|---|
| Environment Name | Click this list and then select the environment in which you want to check the status of the “Sync” activity. |
| Module | Click this list and then select the module for which you want to check the status of the “Sync” activity. |
- After you select the environment and the module, the application displays the sync details as follows:
The sync details are described as below:
| Field | Description |
|---|---|
| Component Id | This field displays the name of the component for which you cut a branch from the master branch. You access the respective component in the child branch, change or fix the application code, and then merge the branch into the master branch. |
| Component Name | This field displays the name of the component for which you cut a branch from the master branch. |
| Component Type | This field displays the type of the component. In the Release Manager application, the type of the component is defined at the database level. The Release Manager application maintains the type of the component as a unique name identifier. |
| Component Version | This field displays the updated version of the component after the child branch is merged into the master branch. |
| SYNC Status | The Release Manager application maintains two types of the sync status for the respective components: Pending, Success |
| Last Sync Time | This field displays the date and time in the dd Mon, yyyy hr:min PM/AM format only if the changes that are incorporated into the component have been successfully synced on VRT. This timestamp value (date and time) specifies the date and time at which the changes were successfully synced on VRT. |
| Remarks | This field displays the textual description related to the sync status. |
| Eye Icon | This field displays the clickable eye icon . After you click the eye icon, the application displays the configuration details of the successfully synced component in JSON format. |
Great Explanation, Thanks.
