I want my app users to take photos of documents like Pan Card or Aadhar Card through the application and subsequently upload these images to the server as per the use case of KYC?
Can you please explain it more
you can use open camera task to click the image whose output you can select as base64 and upload it by passing the data to the api.
Can you explain with steps?
To configure the Open Camera task, proceed by creating a task group mapped to any element’s event.
- In Camera mode, you can choose whether you want the user to capture a video or an image.
Here, I am taking the course for an image
- For Camera Resolution, you can select the quality of the document.
- In Document ID, provide a unique identifier to help the application manage multiple media files.
- In the Base File Path, specify the storage location where the application will store the image in the app’s storage.
- For File Prefix, you can assign a name prefix to all generated files.
- In Max Files Allowed, you can limit the number of documents a user can upload.
- For Max Size, you can optimize the size of the uploaded document.
- Base64: Check this box to activate the feature that captures media in Base64 format.
- Crop: Allow users to crop their images.
- Watermark: Activate the watermark feature.
- In Output Location, provide a path to the location where the media will be stored in the database. You can configure this from the Data Store Tree.
- For Reload Elements, select the elements that need to be refreshed when the user hits the button.
- In Business Rules, configure any applicable business rules and select them here.
You can also refer to Vahana Academy for additional details on this configuration if needed.
Link - Open Camera – Vahana Academy
Hi @Anushka_Gupta,
Thanks for the explanation. This does not cover the file upload steps using DMS service. It would be great if you could provide the screen shot alongside the text.
Once again, thanks for the explanation, it is of great help.
Hi @DebugHorror, sharing the step-by-step guide on how to configure the “Open Camera” task effectively alongside the screenshots.
Please note that the “File upload steps using DMS service” will be shared in a separate post. The link to that post will be shared in this post as well.
- Steps to configure the “Open Camera” task:
-
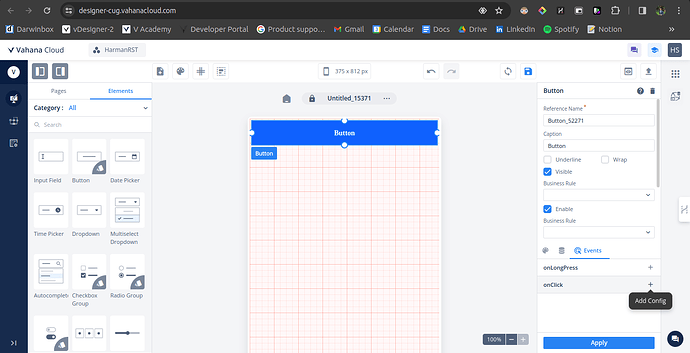
Add a Button Element: Begin by placing a ‘Button’ element on the Designer’s canvas from the ‘Elements’ pane.
-
Configure the OnClick Event: Navigate to the ‘Events’ configuration section and select the “OnClick” Event for the button.
-
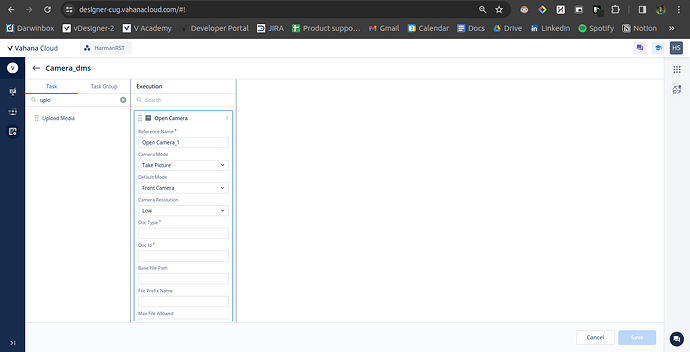
Create a Task Group: Create a “Task Group” responsible for executing the “Open Camera” task.
-
Add the Open Camera Task: Once the “Task Group” is set up, drag the “Open Camera” task into the ‘Execution’ pane.
-
Configure Task Parameters:
-
Camera Mode, Default Mode & Camera Resolution: These parameters can be altered based on the requirement.
-
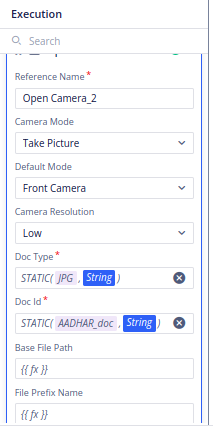
Doc Type: This parameter can be a static value like “JPG, JPEG, PNG”, depending on the requirement.
-
Doc ID: This parameter serves as a unique identifier for your file. For example, “AADHAR_doc.
-
Base File Path, File Prefix Name, Max File Size: These parameters are not mandatory but can be utilized as per the use case.
-
Base 64, Crop, Watermark: These features are also not mandatory and can be checked based on the use case.
-
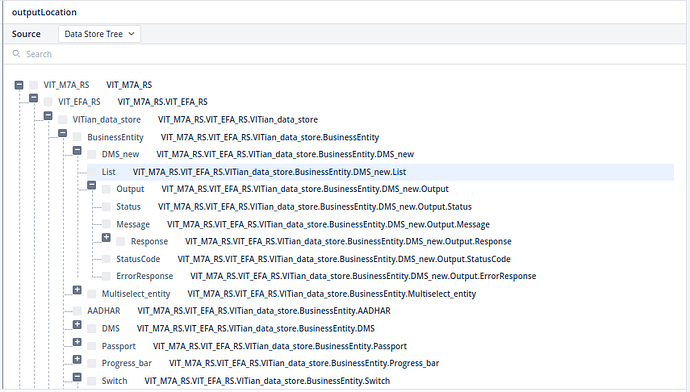
Output location: This parameter specifies the path where the captured file will be stored. Select the particular entity using the smart selector.
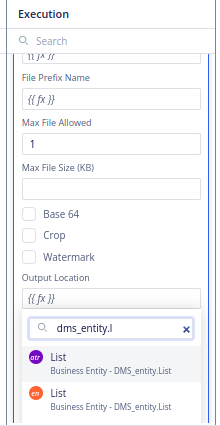
Note: Data Store Tree: Initially it was used to select the path of the entity in which the file will be stored. This has been upgraded to the smart selector as of now.
-
Reload Elements: Can be utilized as per the use case.
-
Additional Notes:
- Configure the Business Rule based on the use case as needed.
By following these steps, one can successfully capture an image using the mobile phone’s camera and store it in a specified entity.
