If we have array of objects in Designer, how we can load the current object in the memory in Designer 2.0 ?
Load Entity Task
Consider an example of an employee team structure, where each employee has a name, employee ID, and a nested team. This example will help us grasp the context for the task.
Example:
employee:
- name: Rahul
employee_Id: ‘01’
team:
- name: Gajender
employee_Id: ‘1’
team: []
- name: Raj
employee_Id: ‘2’
team: []
- name: Saurabh
employee_Id: ‘3’
team: []
- name: Sakshi
employee_Id: ‘4’
team:
- name: Tina
employee_Id: ‘5’
team: []
- name: Riya
employee_Id: ‘6’
team: []
- name: Sahil
employee_Id: ‘7’
team:
- name: Sonali
employee_Id: ‘8’
team: []
- name: Pradeep
employee_Id: ‘9’
team: []
- name: dipender
employee_Id: ‘02’
team: []
Steps to replicate above example on the vDesigner 2.0:
Step 1: Create and Configure the Entity
- Launch vDesigner 2.0 and access the Data Modeler Module.
- Create a new Entity named “load_entity” (or choose any desired name).
- Inside this entity, add JSON objects representing your data structure. Include attributes like “name,” “employee_ID,” and “team.”
- Link the “load_entity” Entity with the Data Model you’re using.
Fig 1: This fig represents the entity creation under data modeler module
Step 2: Bind Data Model with Application
In the Data Modeler Module, bind the Data Model containing the “load_entity” Entity with your application.
Fig 2: This fig represents the binding of the Data Model with application.
Step 3: Design Interface in vDesigner
- Open the vDesigner 2.0
- Drag and drop a Grid List component onto the canvas.
- Map the “employee” attribute from the Data Store to the Grid List. This will allow us to access “name,” “employee_ID,” and “team” attributes.
Fig 3: This fig represents the data binding of list element on vDesigner 2.0
Step 4: Display Data in Grid List
- Inside the Grid List, add Text elements and icons for each employee.
- For the “id” attribute of the Text element, set it to “name” to display employee names.
- Similarly, set another Text element’s “id” attribute to “employee_ID” to show employee IDs.
Fig 4: This fig represents the data binding with the text element for name, inside the Grid list element
Fig 5: This fig represents the data binding with the text element for employee_id, inside the Grid list element
Step 5: Implement Load Entity Task
- Attach an onClick event to the icon within the Grid List.
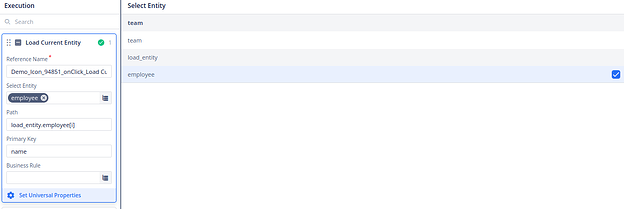
- Add a Load Entity task to access the team structure within the employee ArrayList.
- In the Load Entity task settings:
- Select the parent entity attribute name (i.e., “employee”).
- Define the path as “load_entity.employee[i]” to reference the current index.
- Specify the primary key attribute as “name” to access the array at the current index.
Fig 6: This fig represents the load entity task parameters.
Step 6: Access Nested Structures
To access further in the array list (e.g., the “team” structure), follow the similar steps as in Step 7, adjusting the attribute names accordingly.


