I would like to create a card that contains an image element with text overlaid on top of it. Provide detailed steps on how to achieve this in vDesigner 2.0.
-
Start with a card element on your canvas to achieve this functionality.
-
On that card, drag and map a stack element.
-
Now, on that stack element, map an image.
Note: You can’t provide margins and padding on an element inside the stack element. -
To manage the position of the image element on the stack element, you will need to place it manually.
-
After that, place the text element.
Note: Keep the elements inside the stack on AUTO FILL under the Shape & Decoration tab. -
Click on apply, save, commit, and sync.
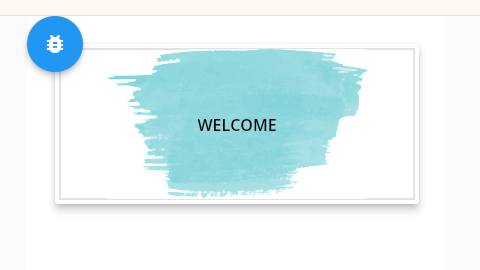
The Outcome will look like this:
1 Like
@AnushkaGupta Can you give some other UI-based examples for a better understanding of the power & feasibility of the stack element?
Here, is one more example of using stack :

To achieve this I have followed some steps which are
- First use a header element.
- Then, map one stack element on that header.
- I have mapped two image elements and one text element on that Stack element.
- In the stack element, you can’t provide margins to the specific elements. you have to set the elements manually according to your need on the stack element.
- Keep your image elements on AUTO-FILL and the image element should be on fill more rather than cover.
- You can also provide manual size if needed, according to Figma.