How can I achieve this in vDesigner-2.0?
Introduction
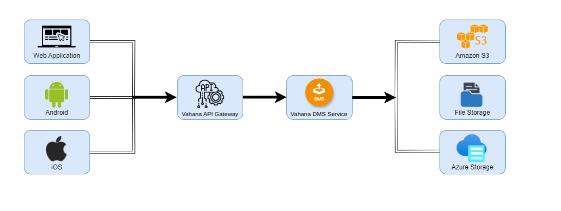
1.1 Document Management Service (DMS)
Vahana document manager service is a tool or utility that is used to upload/fetch media/documents from different channels like Mobile, Web or any other application in Vahana ecosystem.
This document outlines the process for integrating DMS functionality within your mobile application using vDesigner-2.0
1.2 Basic features of Vahana DMS
Below are the basic features provided in Vahana DMS.
- Upload Document & Data about the document
- Security and access control of documents
- Different type of storage
- AWS S3
- Azure
- File System
- Base64
- Fetch Document via
- URL
- Base64
- Multipart
- Different type of Access level
- ORG
- APP
- VRT
- Fetch Document using different filters
- Delete Document
- Update Data about Document
- Search Document
1.3 List of available APIs in DMS service:
| Sr. No | API Name | API Description | API Details |
|---|---|---|---|
| 1 | Upload Document | This API is used to upload Document(s). | Upload Media |
| 2 | Upload Document and get URL | This API is used to upload Document(s) and get the URL of the uploaded document | Upload Media And Get URL |
| 3 | Download Document by Id | This API is used to download document(s) on the basis of document Id(s). | Fetch Media Files |
| 4 | Download Document by Filter | This API is used to download document(s) on the basis of Media Data Object Filters | Fetch Media file via Filters(custom) |
| 5 | Download Document Zip by Id | This API is used to download document(s) Zip on the basis of document Id(s). | Download Zip of Media Files |
| 6 | Download Document Zip by Filter | This API is used to download document(s) Zip on the basis of Media Data Object Filters | Download Zip of Media FIles via Filters(custom) |
| 7 | Delete Document | This API is used to delete Document on the basis of Document Id | Delete Media |
| 8 | Get Media Data Object by Id | This API is used to fetch list of Media Data Objects on the basis of given list of ids | Fetch Media Data Object |
| 9 | Get Media Data Objects by Filters | This API is used to fetch list of Media Data objects on the basis of given filters | Fetch Media Data Object with Filters |
| 10 | Update Media Data object | This API is used to update Media Data object on the basis of given Document Id. | Update Media Data |
For more information, visit: https://confluence.vahanacloud.com/display/TD/Vahana+Document+Manager
1.4 Simplified data flow architecture in DMS:
-
In the case of Upload Media API:
Note: No vConnect service configuration is required for Uploading documents. -
In the case of Fetch Media API
Note: vConnect service configuration is required for Fetching documents.

2. Sample Use Case: Photo Capture and Upload
This guide focuses on a specific use case: enabling users to capture photos of their PAN card, Aadhaar card, or similar documents using the “Open Camera” task within vDesigner-2.0. Once captured, the photos should be uploaded securely to the server for storage using a DMS service. The principles covered here can be adapted to other DMS use cases as well.
3. Prerequisites
Before implementing this use case, ensure you have the following in place:
3.1 Infra Support
3.1.1 Storage ID
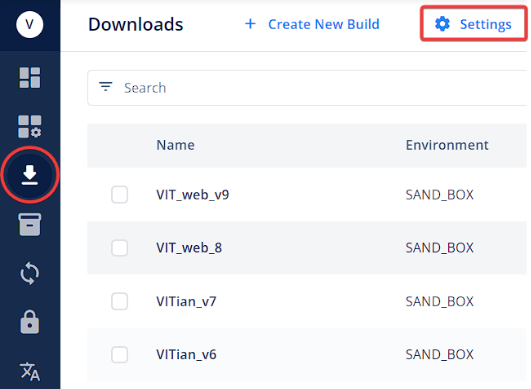
This is a unique identifier used to store and retrieve documents in the DMS corresponding to your application. You will need a designated storage ID for DMS functionality. The storage ID will have to be configured in the following path of vDesigner-2.0:
L1 > Downloads > Settings > Environments > Middleware> Storage Id
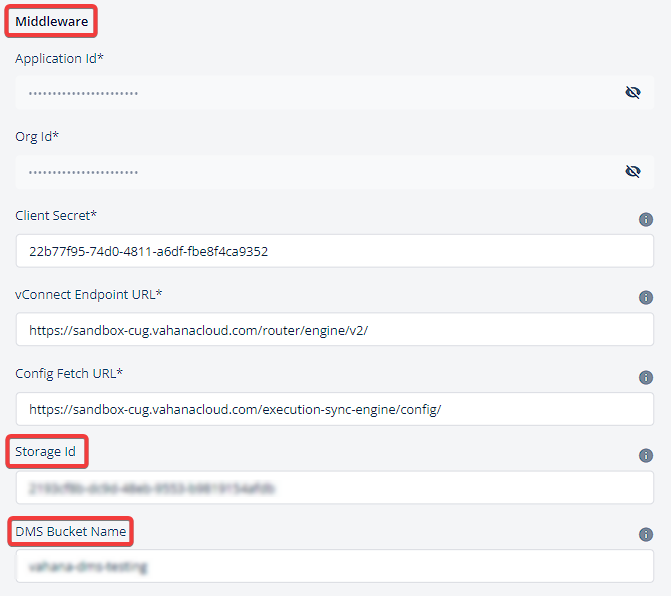
3.1.2 DMS Bucket Name
A designated bucket within the DMS where uploaded documents will be stored. The DMS Bucket Name will have to be configured in the following path of vDesigner-2.0:
L1 > Downloads > Settings > Environments > Middleware> DMS Bucket Name (Refer the screenshot above)
3.1.3 Port Number
Port numbers typically refer to the specific port on a server that is used to communicate with the API. Port number will be entered in the Request URL for the DMS API. Port number is to be updated in the request URL and it can be located next to “<vrt_ip>”.
http://<vrt_ip>:<port>/document-manager/download/v1/getDocumentsUsingIds
3.1.4 Set up the DMS service for your specific VRT.
3.2 Request URL for DMS API
http://<vrt_ip>:<port>/document-manager/download/v1/getDocumentsUsingIds
4. Environment Variable Configuration
4.1 Setting up the Environment variable
-
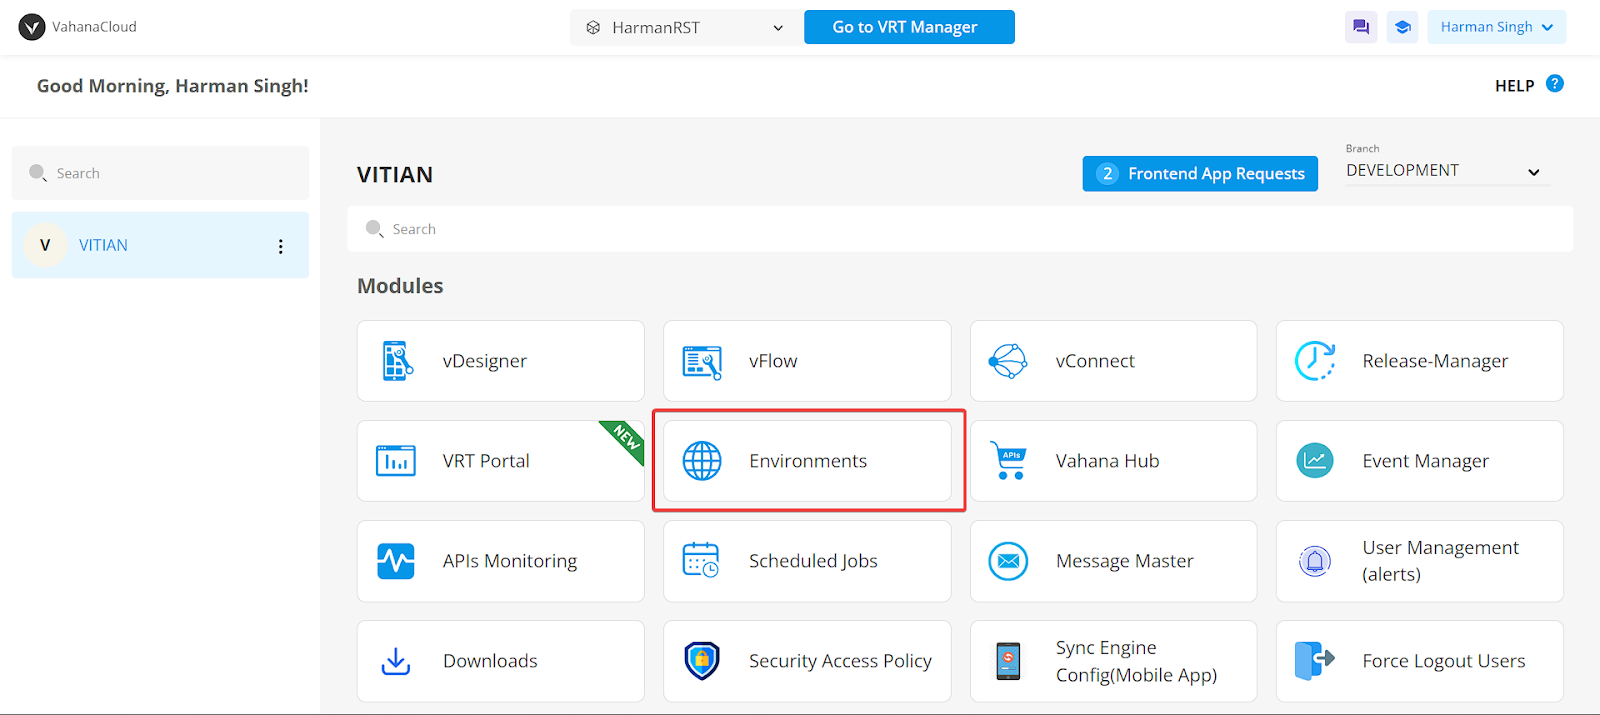
Open the ‘Environments’ module via the Middleware.
-
Select the ‘Variables’ tab and choose “Add Variable.”
-
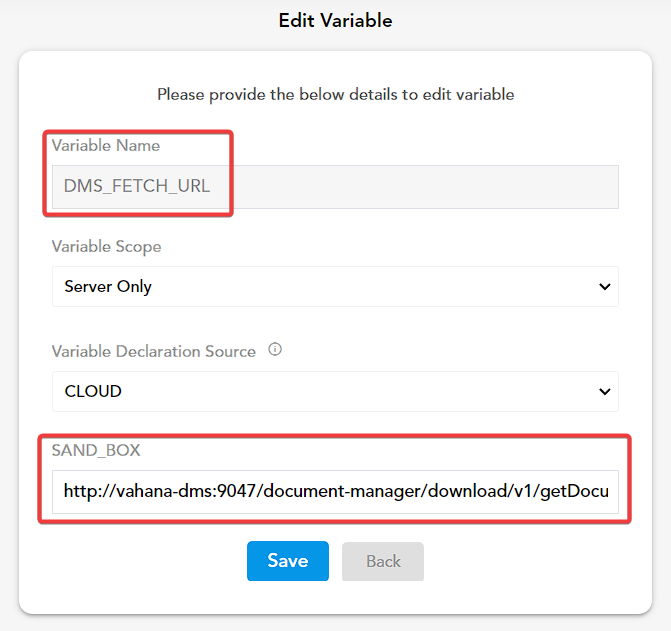
Define a “Variable Name” of your choice. Leave the “Variable Scope” as “Server Only” (default) and the “Variable Declaration Source” to ‘CLOUD.’
-
Input the “Request URL” along with the updated “Bucket Name” & “Port number” (refer to Section 3.1.3 for a simplified explanation) in the “Environments” parameter (e.g., SAND_BOX, UAT) and click ‘Create.’

5. vConnect Configurations
vConnect acts as a bridge between your application and the DMS service.
5.1 DMS Fetch API Configuration
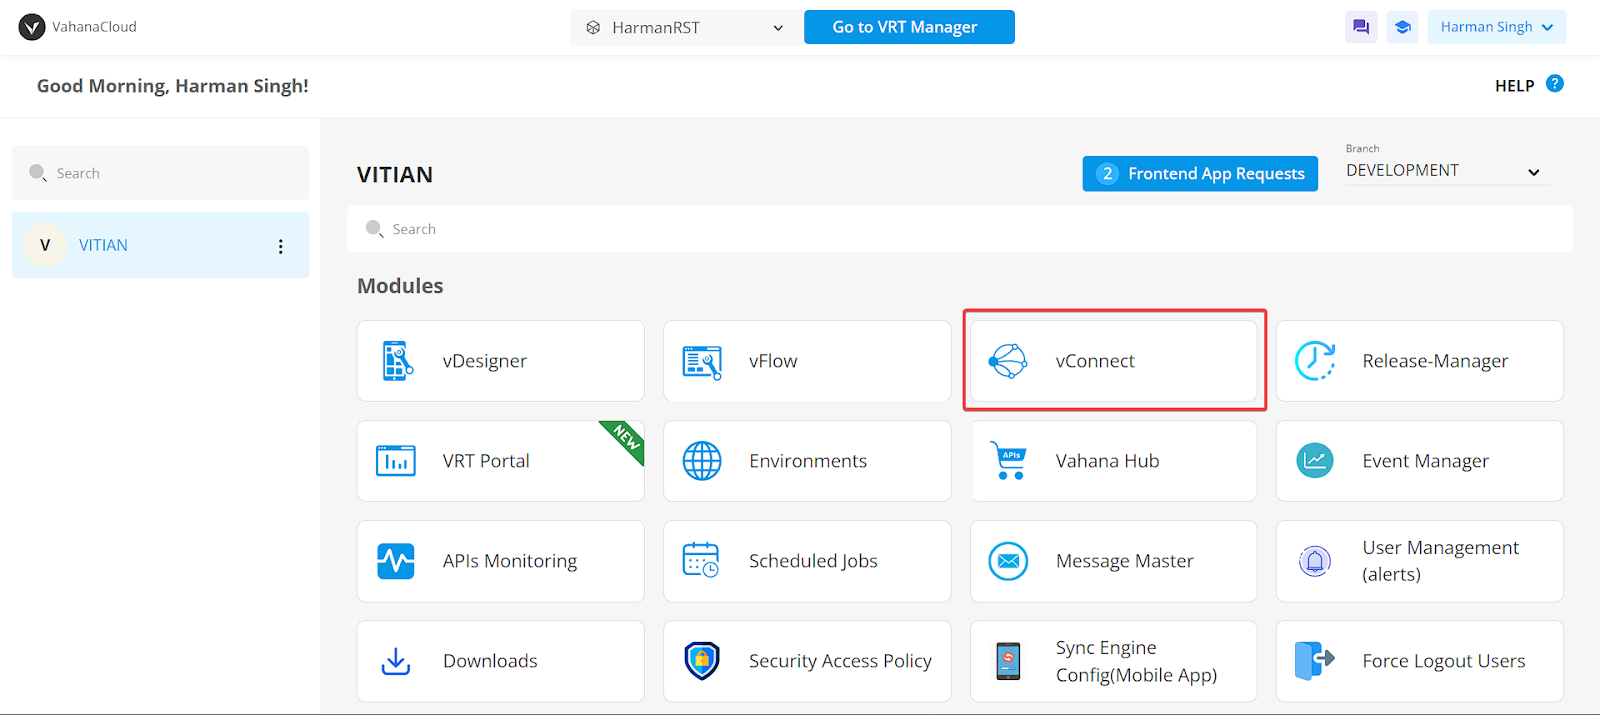
- Access vConnect API Management:
-
Navigate to the vConnect module within the Middleware platform.
-
Open the “API Management” tab.
- Create a New API:
-
Click the “Add New API” button located in the top right corner.

- Define API Details:
-
Leave the “API Type” header as the default “REST/SOAP”.
-
In the “API Request Details” section, provide a desired name for your DMS FETCH API. The description is optional.
-
Ensure the “Is Audit Enabled” parameter remains set to ‘Y’.

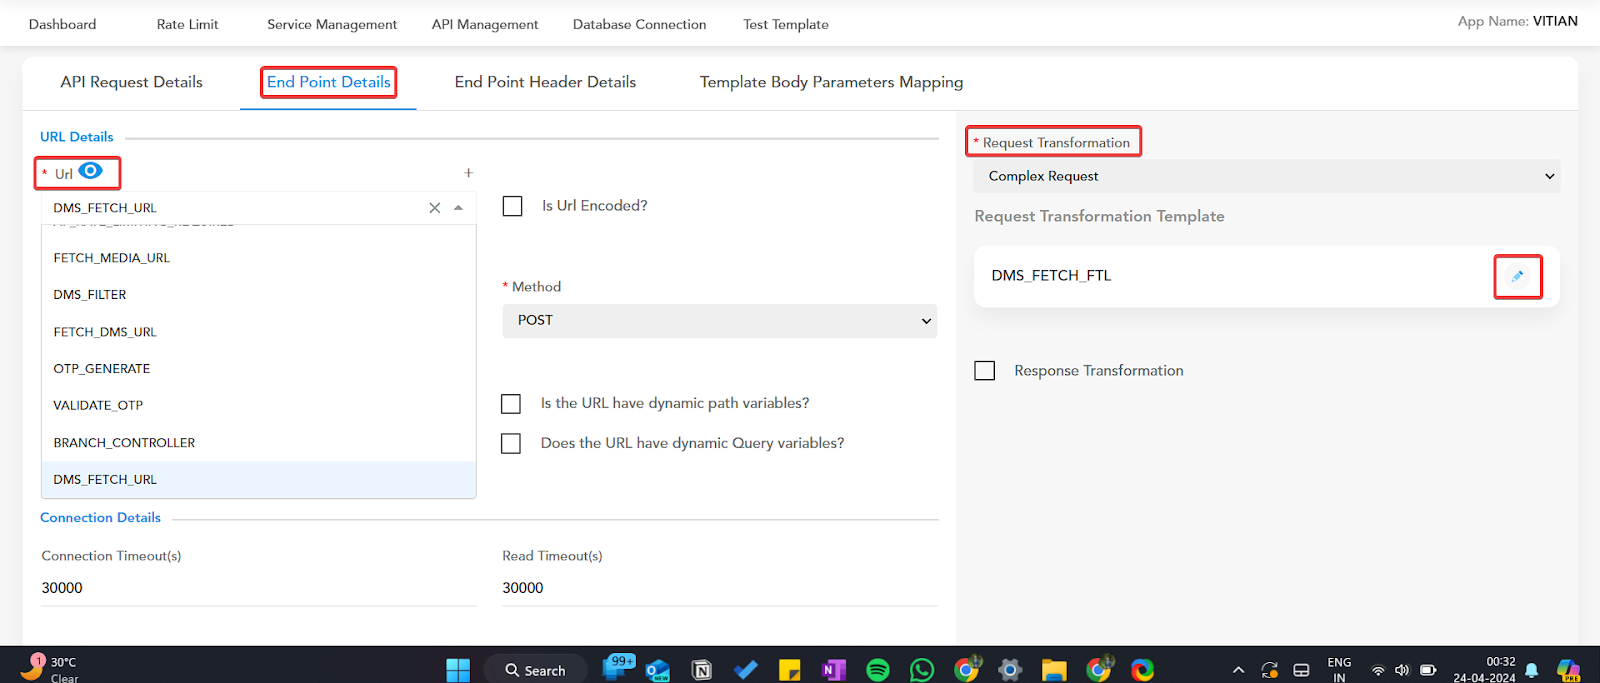
- Configure End Point Details:
- Open the “End Point Details” section.
- From the “URL” dropdown menu, select the variable name you configured in the ‘Environments’ tab.
- Leave all other parameters to their default values.
- Request Transformation:
-
Under “Request Transformation” in the top right corner, select “Complex Request”.
-
Click the “Request Transformation Template” option below it.
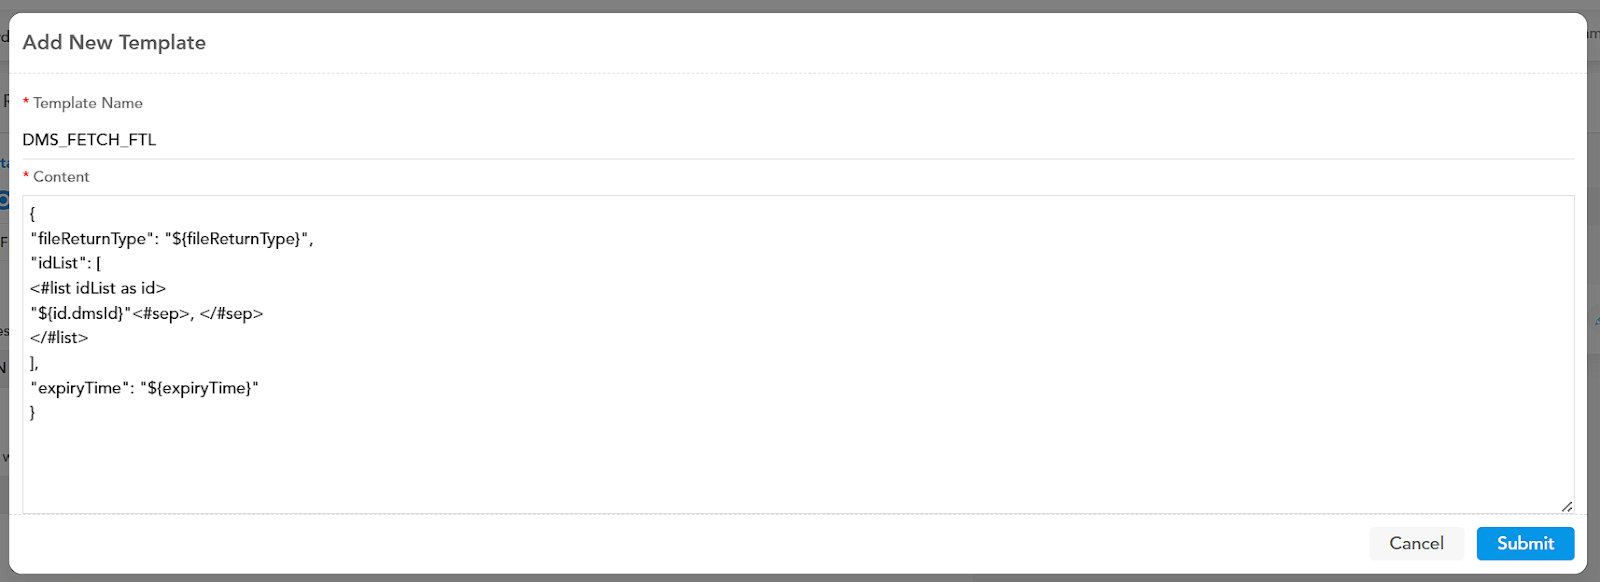
- Create Request Transformation Template:
-
In the “Add New Template” pop-up window, provide a name for your template.
-
Input the following Freemarker Template (FTL) content in the ‘Content’ field:
{ "fileReturnType": "${fileReturnType}", "idList": [ <#list idList as id> "${id.dmsId}"<#sep>, </#sep> </#list> ], "expiryTime": "${expiryTime}" } -
Click ‘Submit’ to save the template.
- Configure End Point Headers:
-
Open the “End Point Header Details” section.
-
You will see “Header Details 1” configured by default. Leave this header unchanged.
-
Click “Add New Header Details” at the bottom of the screen.
- Define Additional Headers:
-
Refer to the provided table to configure the remaining headers.
Sl. No. Header Details Source of Value Value 2 orgid Header orgid 3 appid Header appid 4 loginid Header loginid 5 requestid Header requestid 6 storageid Constant Input the Storage ID provided to you by the Infra team in this field
- Template Body Parameters Mapping:
-
Open the “Template Body Parameters Mapping” section.
-
Configure the ‘Parameters’ section according to the provided table:
Sl. No. Parameter Source of Value Value 1 idList Request_Body $.idList 2 fileReturnType Request_Body $.fileReturnType 3 expiryTime Constant 3000

- Save API:
- Click the ‘Save’ button on the bottom right corner to complete the API creation process.
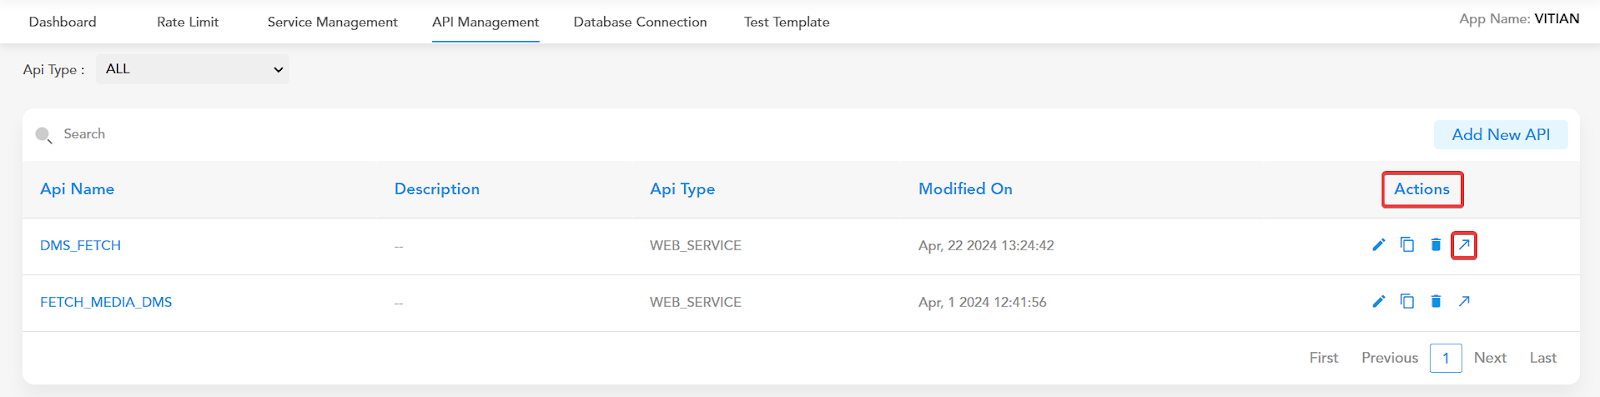
5.2 DMS Fetch Service Creation
- Export DMS Fetch API as Service:
-
After successful API configuration, you’ll be redirected to the “API Management” section.
-
Locate your newly created DMS API and click the ‘Arrow’ icon under the ‘Actions’ tab.
-
Select ‘Export’ from the pop-up menu to export the API as a consumable service.
- Manage Service:
-
Open the “Service Management” section.
-
Locate the DMS service you created and click the ‘Edit’ icon under the ‘Actions’ tab.
-
Change the “Session Scope” to ‘Device’.
-
Scroll down and click ‘Save’ to finalize service configuration.

5.3 Release Management
- Sync Environment:
-
Re-open the ‘Middleware’ platform and select the “Release Manager” module.
-
Ensure proper deployment by syncing your chosen ‘Environment’ for the vConnect’s DMS service integration within your application’s environment.


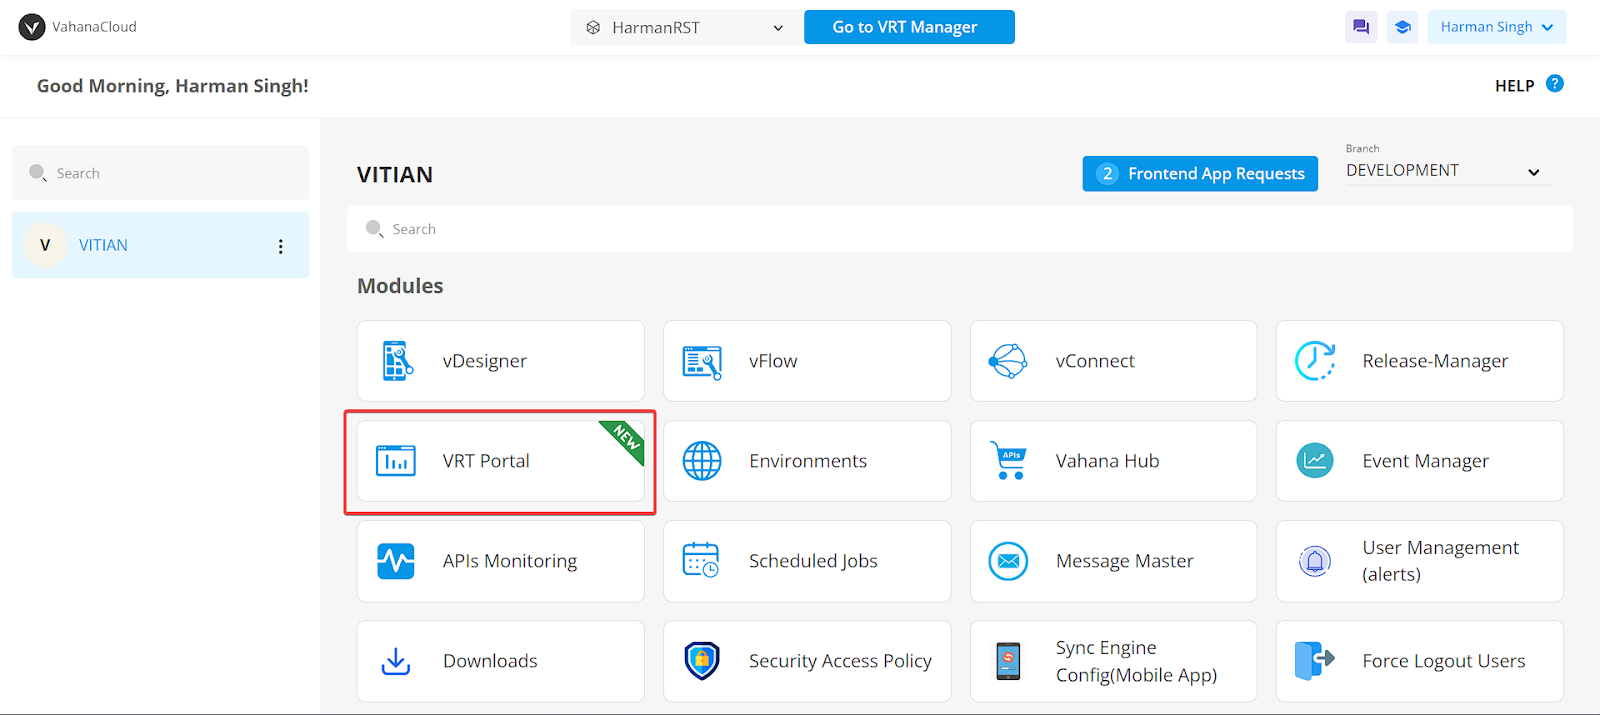
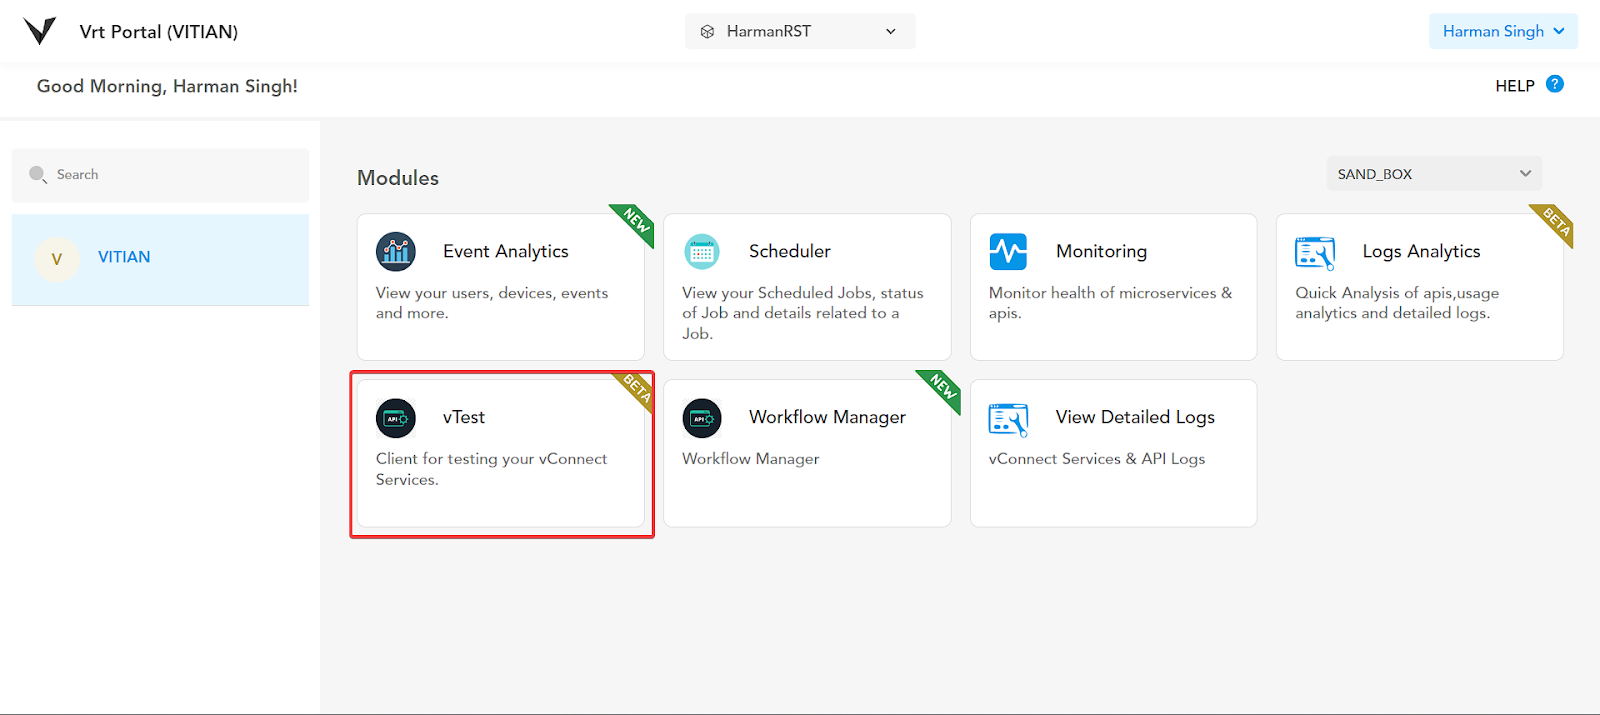
5.4 vTest Integration
- Access vTest: Utilize vTest to verify DMS service functionality before integrating it into vDesigner-2. You can access vTest in two ways:
-
Navigate to Middleware > VRT Portal > vTest
-
Navigate to Middleware > vConnect > Service Management > Actions > Play icon (redirects to vTest)

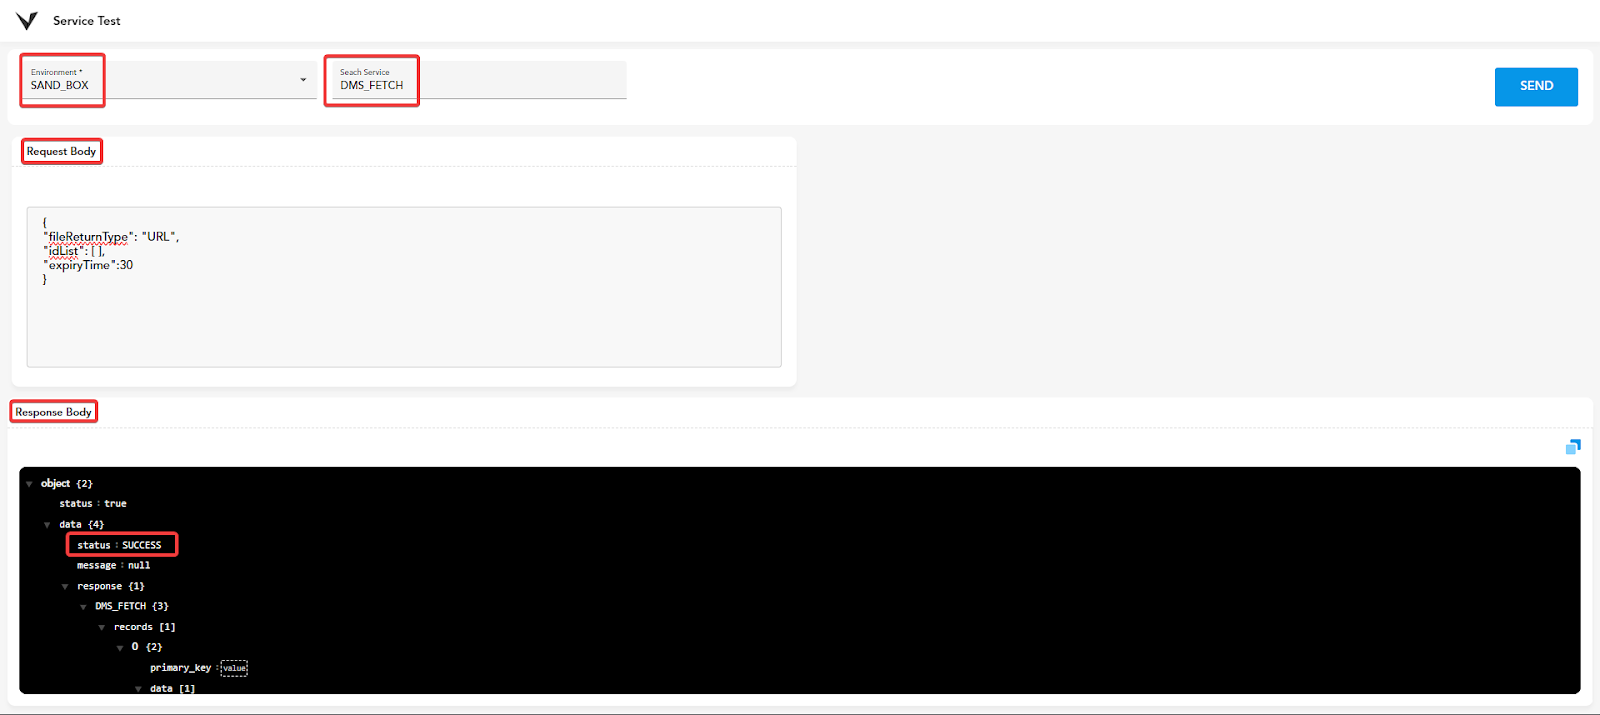
- Configure Test Request:
- In vTest, select the ‘Environment’ where you configured the DMS service.
- Search for the specific ‘Service Name’ you created.
- Send Test Request:
-
In the “Request Body” field, enter the following request and click ‘Send’:
JSON: { "fileReturnType": "URL", "idList": [ ], "expiryTime":30 } -
If the “Response Body” returns ‘SUCCESS’, you’re good to go, else in case of ‘FAILURE’, re-check the entire configuration till this point.
6. vDesigner-2.0 Configurations
This section details the configuration steps within vDesigner-2.0 to integrate the previously created DMS functionality.
6.1 Entity Creation and Data Model Linking:
-
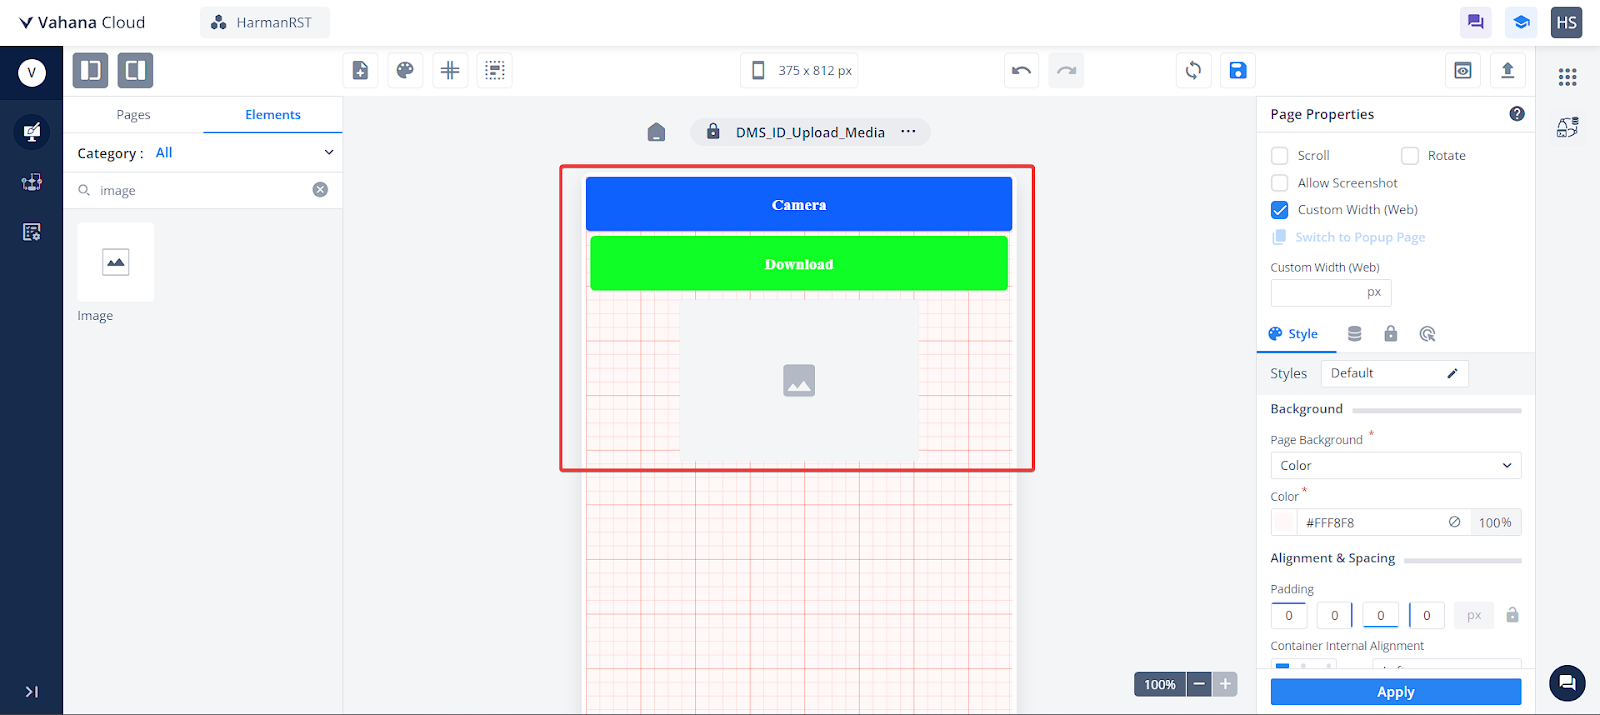
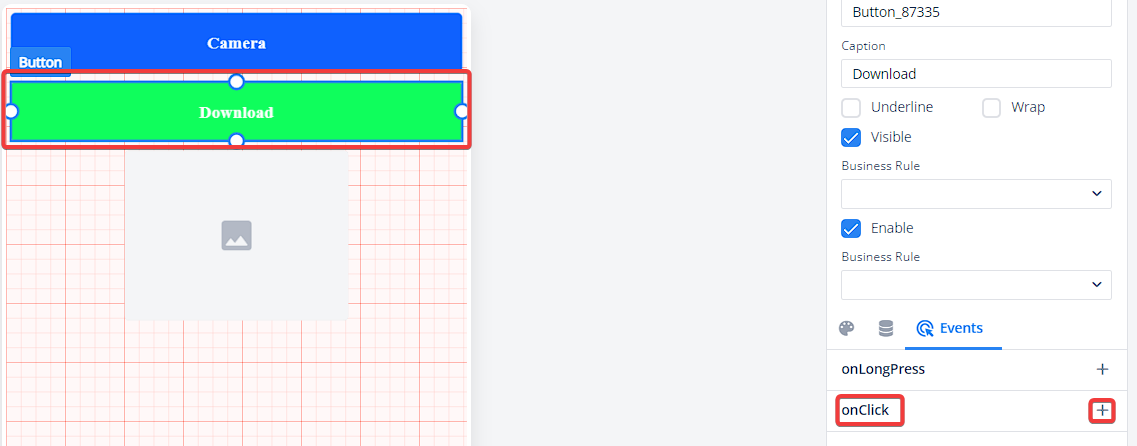
Create Page and UI Elements:
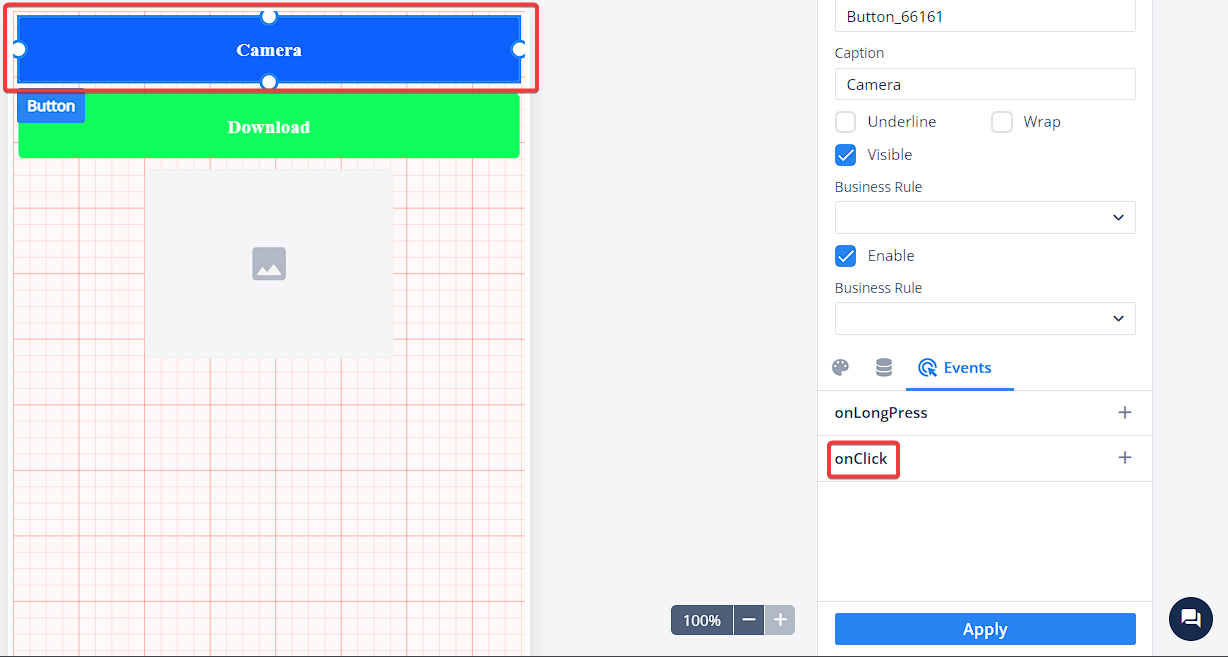
- In your vDesigner Canvas, create a new page.
- Drag and drop two button elements onto the Canvas, labeling one “Camera” and the other “Download”.
- Additionally, drag and drop an image element onto the Canvas.
-
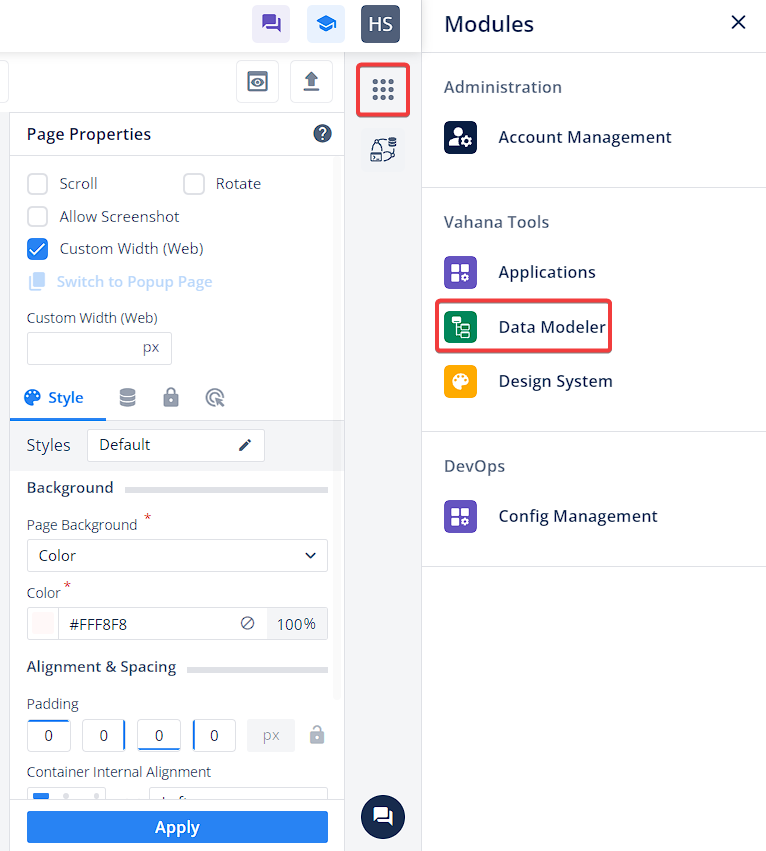
Create Entity:
- Click the “Modules” icon in the top right corner and select “Data Modeler” under “Vahana Tools”.
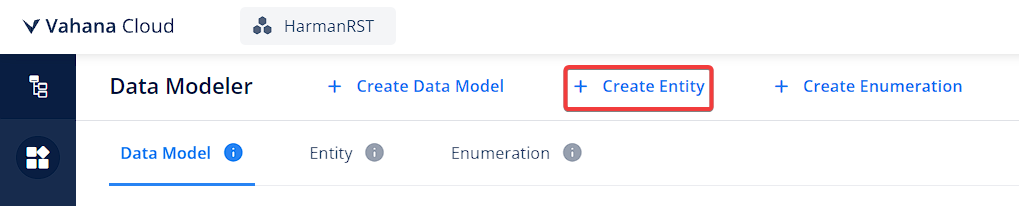
-
In the Data Modeler, click “+ Create Entity”.
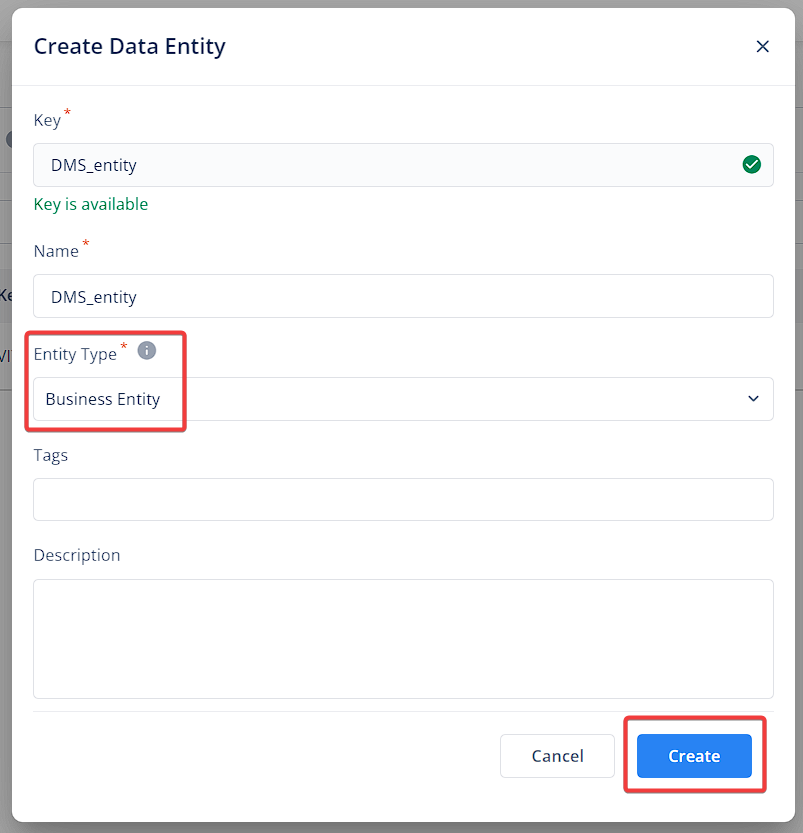
-
In the “Create Data Entity” pop-up, provide a unique identifier as the “Key” and set the “Entity Type” to “Business Entity”. Click “Create”.
-
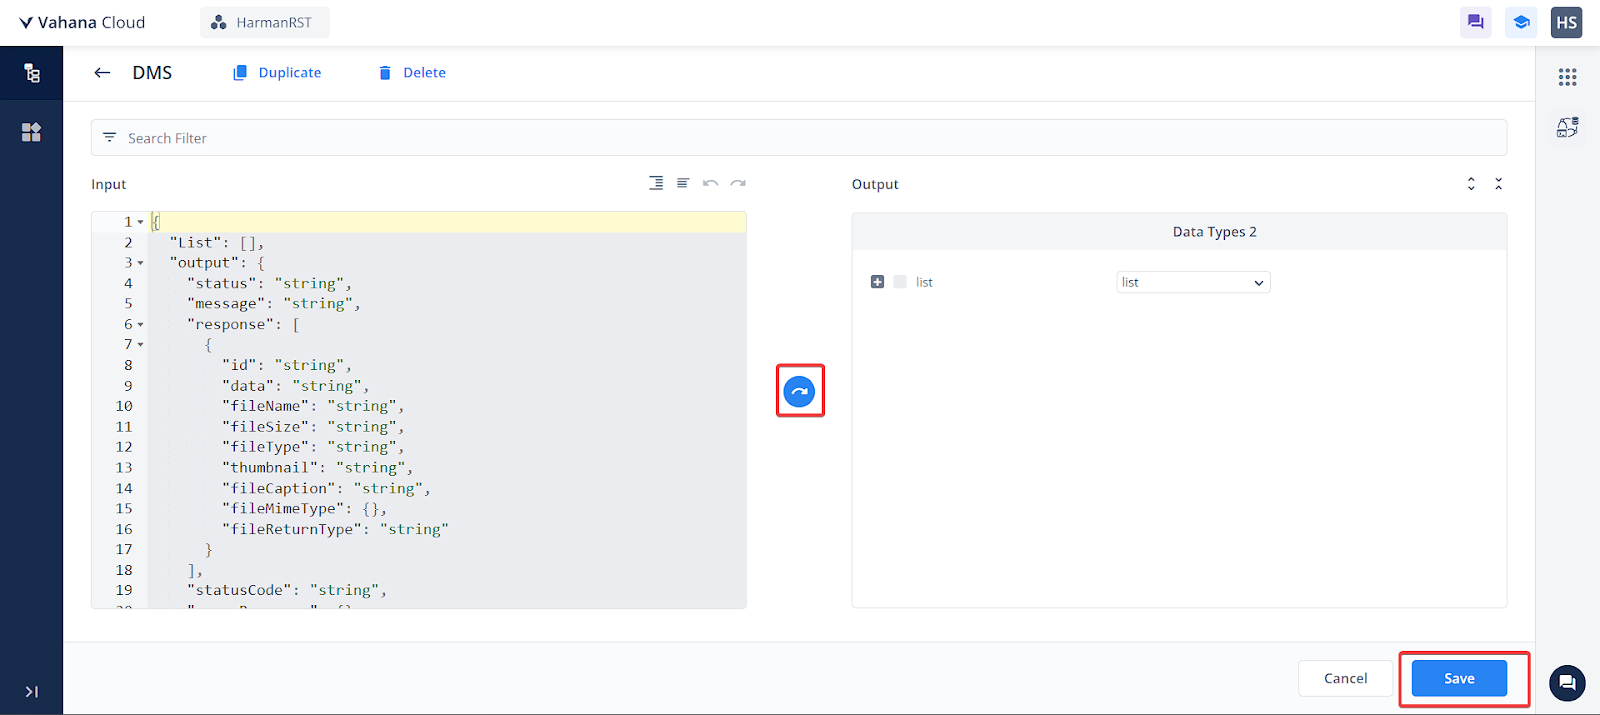
Define Entity Response:
- Open the created entity and paste the following response structure:
JSON:
{ "List": [ ], "output": { "status": "string", "message": "string", "response": [ { "id": "string", "data": "string", "fileName": "string", "fileSize": "string", "fileType": "string", "thumbnail": "string", "fileCaption": "string", "fileMimeType": {}, "fileReturnType": "string" } ], "statusCode": "string", "errorResponse": {} }} -
Click “Save” after pasting the response structure.
-
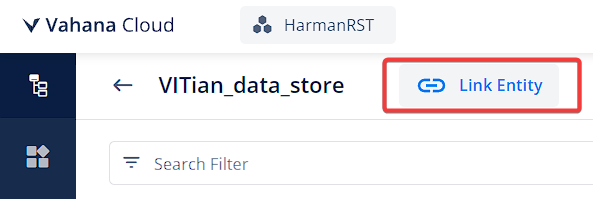
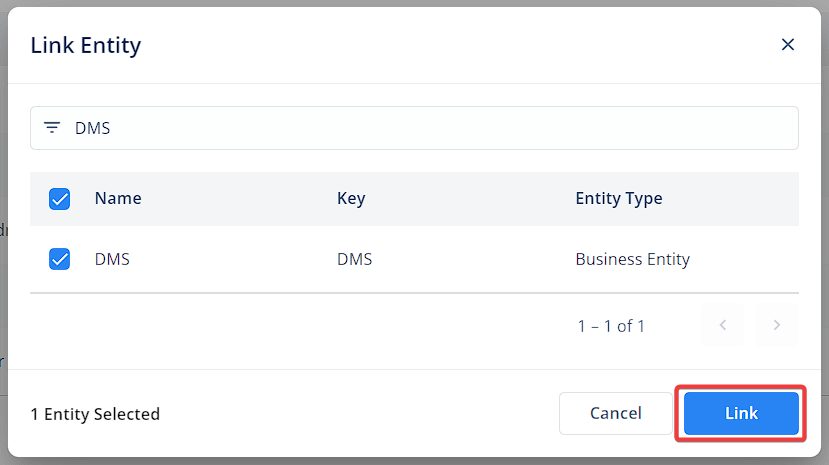
Link Data Model:
- Open the “Data Model” section and locate the data model created for your application.
- Click “Link Entity”, select the newly created entity, and click “Link”.

6.2 Open Camera Task configuration:
-
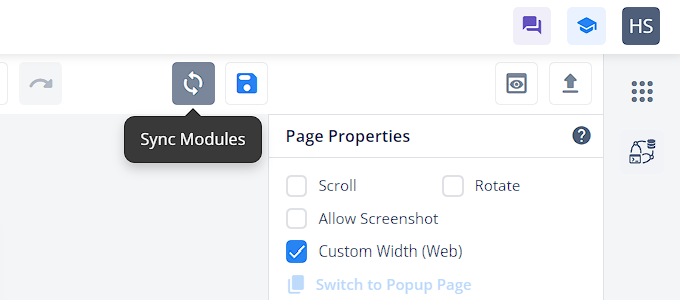
Sync Data Model:
- Return to the Designer’s Canvas screen.
- Click the “Sync Modules” option on the left next to the “Save” button. This synchronizes the Data Modeler with your application.
- Once the synchronization is complete, proceed to configure the “Camera” button element.
-
Configure Camera Button:
- Select the button element labeled “Camera”.
- Go to Events > onClick > Create Task Group and provide a relevant name for the Task Group.
-
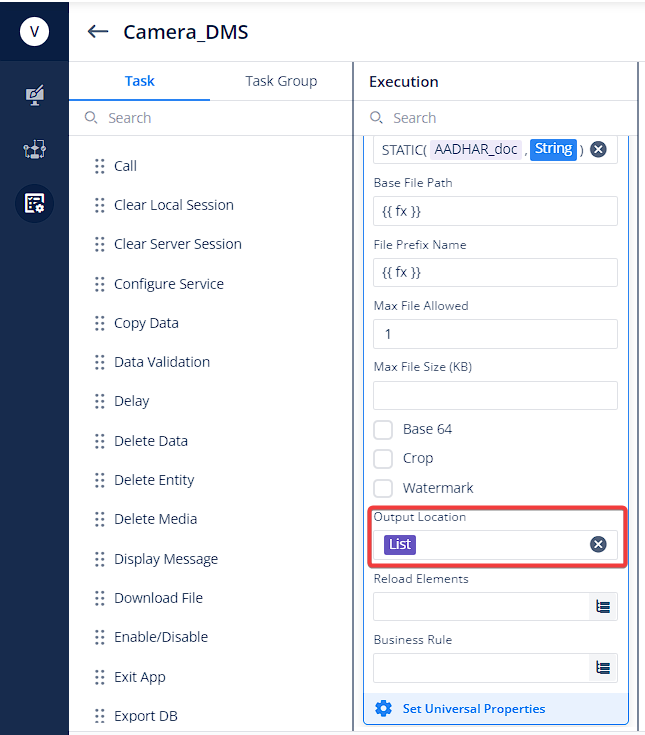
In the “Task” section, search for and drag the “Open Camera” task to the “Execution” pane. Configure the task parameters as follows:
- Camera Mode, Default Mode & Camera Resolution: Adjustable based on your needs.
- Doc Type: Set a static value like “JPG, JPEG, PNG” depending on requirements.
- Doc ID: This serves as a unique identifier for your file (e.g., “AADHAR_doc”).
- Base File Path, File Prefix Name, Max File Size: Optional parameters based on your use case.
- Base 64, Crop, Watermark: Optional features based on your use case.
- Output Location: Specify the path where the captured file will be stored. Use the smart selector to choose the relevant entity.

6.3 Upload Media Task
-
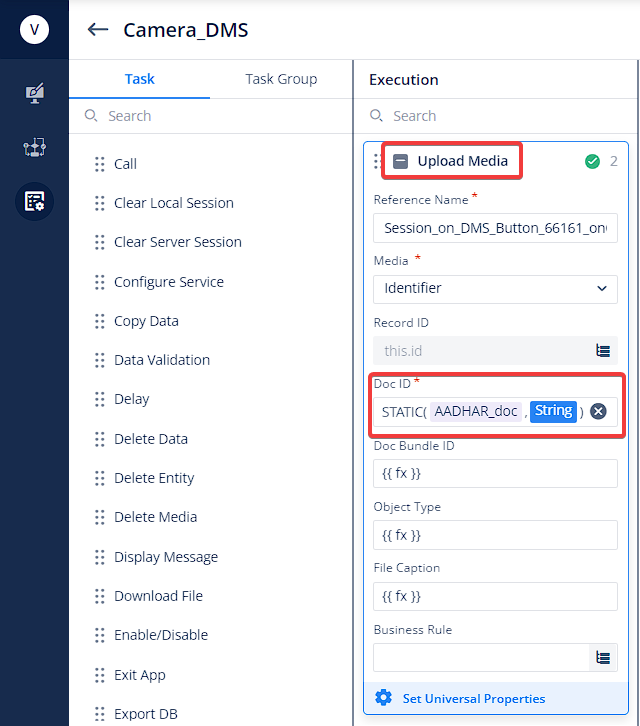
After configuring the “Open Camera” task, search for and drag the “Upload Media” task to the “Execution” pane. Configure this task as follows:
- Media Property: Select “Identifier” to use an alphanumeric value for managing specific files.
- Record ID Parameter: Leave unchanged as it serves as a primary identification key.
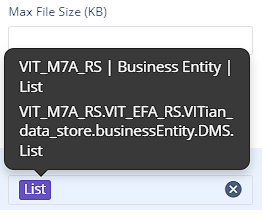
- Doc ID Parameter: Set this to the same Doc ID used in the “Open Camera” task. Use the Smart Selector’s “Static” function and enter “AADHAR_doc” as the value with “String” data type.
- Doc Bundle ID Parameter: A static value can be used here as well.
- Note: The “Object Type” parameter will be removed from this task.
-
Additional Notes:
- Use the “File Caption” parameter to add a caption to your file, either statically or fetched from an entity.
- You can provide a message on failure in the “Upload Media Task” by going to the “Set Universal Properties” option at the bottom of the task > Error Handling > Message on failure > Add New > Create New > Fill in the required details > Save.
6.4 Configure Service Task
-
Event Trigger:
- In the Designer Canvas, select the “Download” button element.
- Navigate to Events > onClick > Create Task Group and assign a relevant name.
-
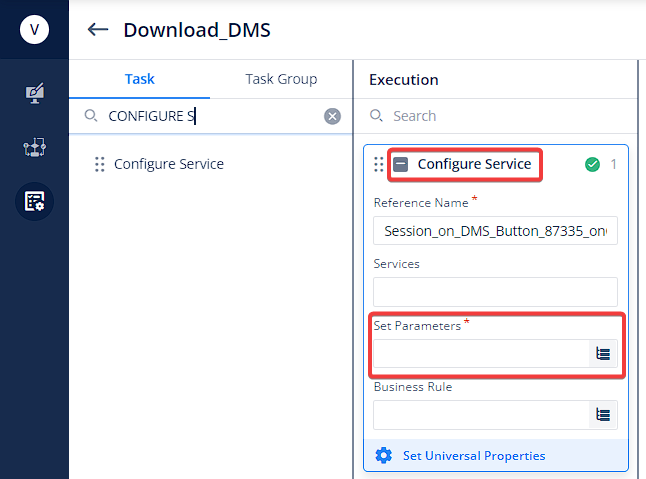
Adding “Configure Service” Task:
-
In the “Task” section, search for and drag the “Configure Service” task to the “Execution” pane.
-
Configure the task as follows:
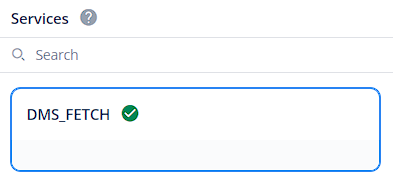
- Set Parameters: Select the service created in vConnect. Click the “Consume” button on the right to confirm.

-
-
Request Parameters:
- Choose ‘Body’ next to ‘Headers.’ Click " + Add Object."
-
Enter the following JSON request in the “Edit: Json Object” pop-up and save:
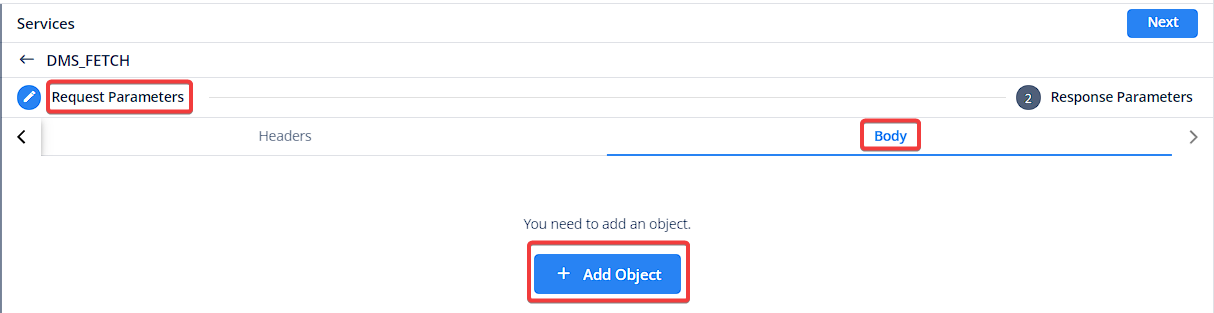
JSON:
{
"fileReturnType": "URL",
"idList": [],
"expiryTime": 60
}
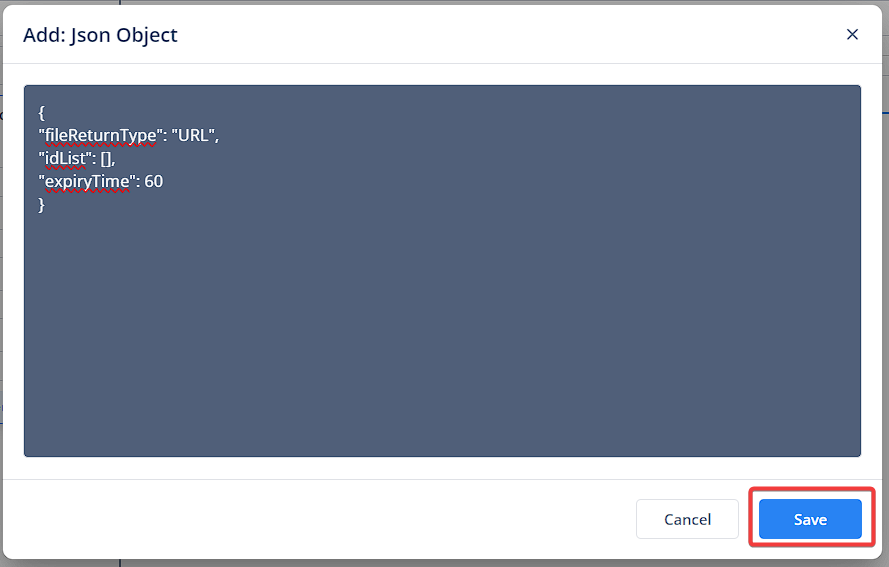
-
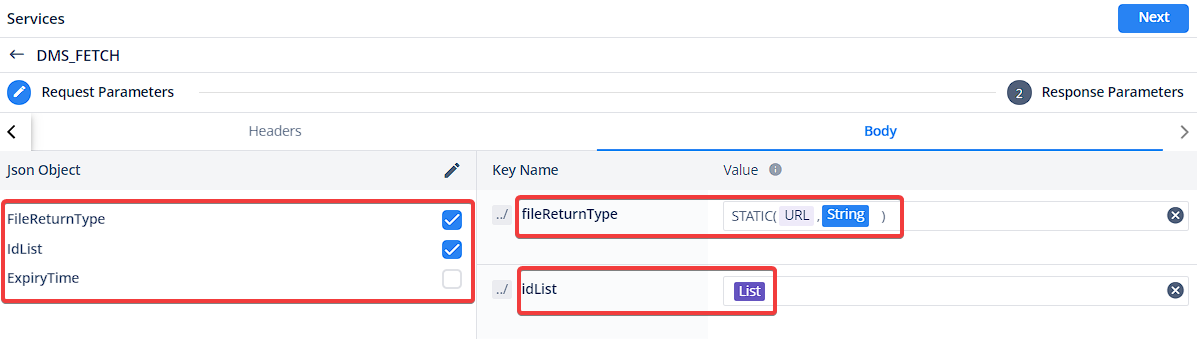
For “FileReturnType,” check the box and set the value to “URL” using the “Static” function in the Smart Selector. Choose “String” as the data type.
-
Similarly, check the box for “IdList” and map the “List” object from the initially created entity to the “Body” section.
-
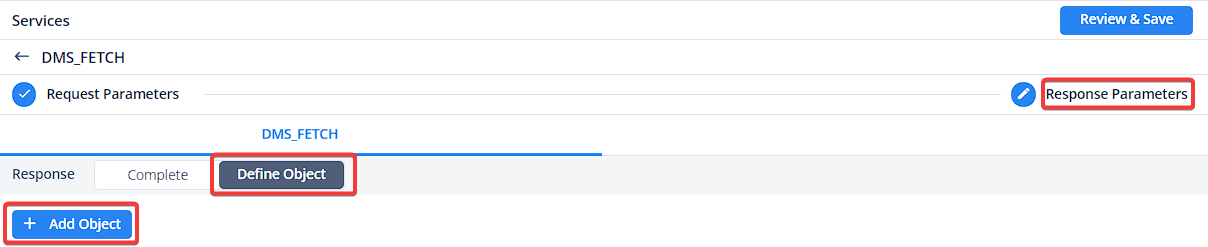
Response Definition:
- Click “Next” on the top right.
- Choose “Define Object” for “Response” and click “Add Object.”
-
Enter the following JSON response and save:`
JSON
{

"status": "SUCCESS",

"statusCode": "VAHANA_DMS_200",

"message": "Media Files Downloaded Successfully.",

"response": [

{

"id": "886fc0d0-e771-11ee-bec4-a39a59f10043",

"thumbnail": "https://jar-vahana.s3.ap-south-1.amazonaws.com/images/image.png",

"fileSize": "7409 kb",

"fileType": "file",

"fileName": "1711018526909408.jpg",

"fileCaption": "1711018526909408.jpg",

"fileMimeType": null,

"fileReturnType": "url",

"data": "https://kotak-docs.s3.ap-south-1.amazonaws.com/92117171074082910387975_NA_NA/886fc0d0-e771-11ee-bec4-a39a59f10043.jpg?X-Amz-Algorithm=AWS4-HMAC-SHA256&X-Amz-Date=20240321T110518Z&X-Amz-SignedHeaders=host&X-Amz-Expires=3000&X-Amz-Credential=AKIASBSCGSETZQYYCM33%2F20240321%2Fap-south-1%2Fs3%2Faws4_request&X-Amz-Signature=bc747df3d6bc9307f47583f64d431644610e73ad3ba7759e4be7c7b005ed2eae"

}

],

"errorResponse": null

}
-
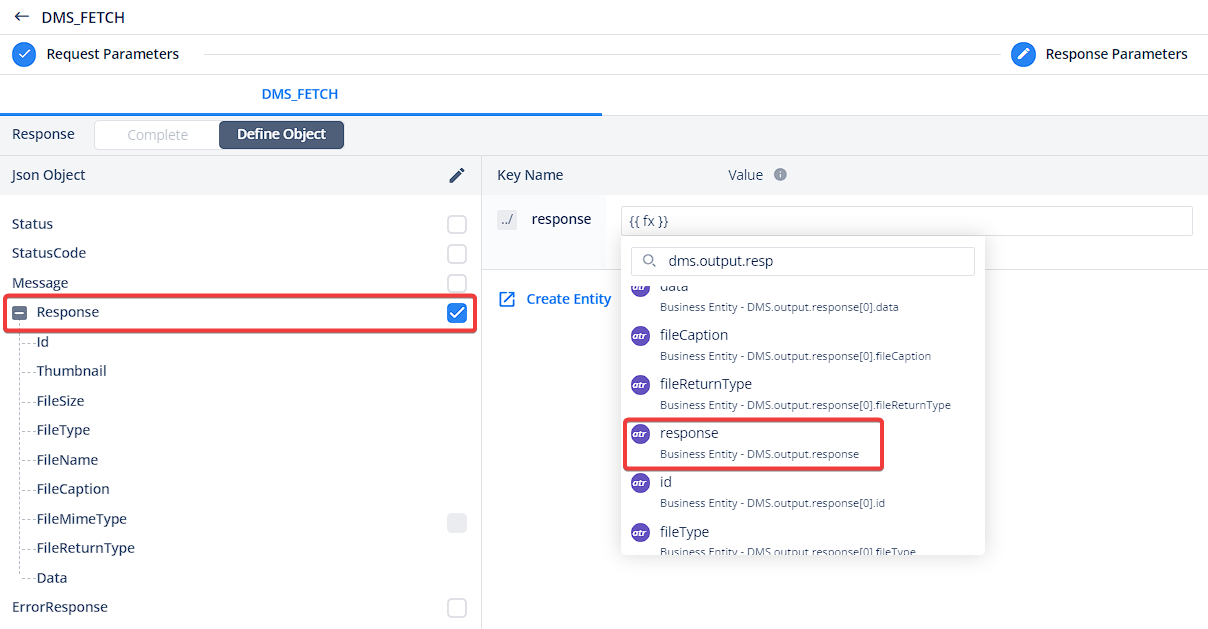
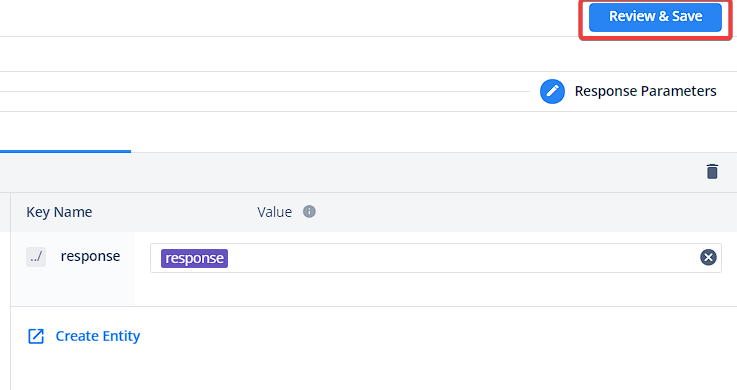
Select the ‘Response’ key and map it with the ‘Response’ attribute of the DMS entity.
-
Review and Save:
- Click “Review & Save” on the top right. Verify the mapping and save the configuration.
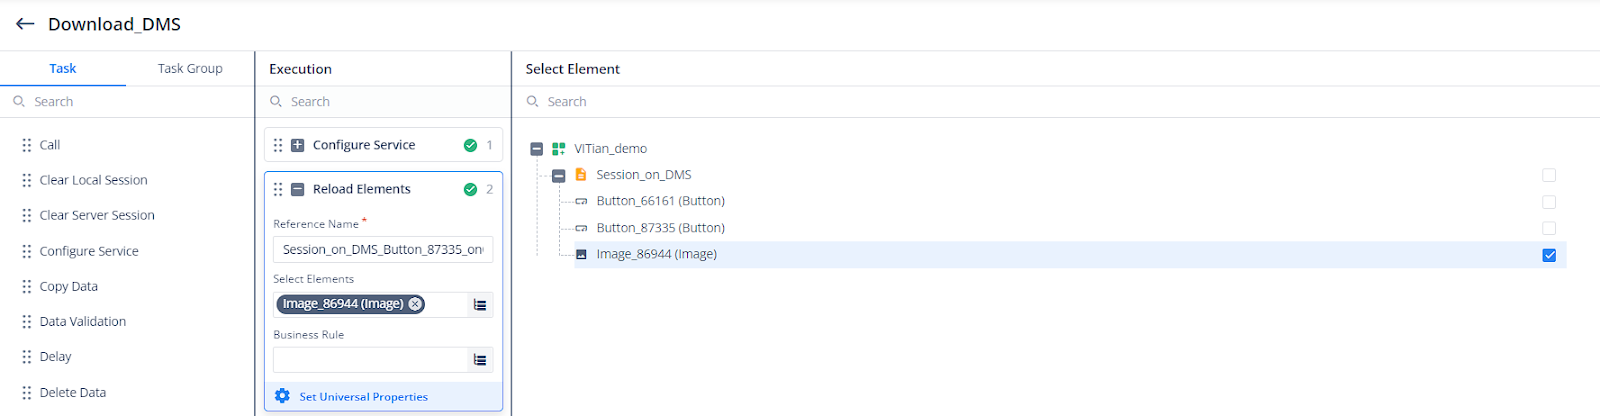
6.5 Reload Elements Task
-
After configuring the “Configure Service” task, search for the “Reload Elements” task and drag it to the “Execution” pane.
-
In the “Select Elements” parameter, choose the “Image” element and save.
6.6 Configure Image Data Source
-
Go back to the “Canvas” screen and select the “Image” element.
-
In the “Image Properties,” navigate to the “Data” tab.
Within the “Input” section, map the “Entity Path” to the DMS response data as follows:DMS.output.response[0].data

6.7 Save and Deploy: On the Canvas, click Apply > Save > Commit. Finally, Deploy the configurations via L1 and test the functionality on your mobile build.
- Error Debugging
This section outlines potential errors that may occur during the configuration process and troubleshooting steps for both vConnect and vDesigner-2.0 levels.
7.1 vConnect Level Errors
Here are common errors you might encounter while working with vConnect:
-
Incorrect Request URL: Double-check the URL specified in the Environment Variable configuration. Ensure it points to the correct DMS endpoint and avoid any spaces within the URL.
-
Improper FTL: Verify that the FTL syntax is free of errors. Ensure it follows the correct format.
-
Incorrect Headers & Template Body Parameters: Confirm that the headers and template body parameters are formatted correctly according to the API requirements.
-
Device Level Session: Make sure the “Device Level Session” property is selected while editing the service within vConnect.
7.2 vDesigner-2.0 Level Errors
These errors are specific to the vDesigner-2.0 configuration:
-
Incorrect Task Parameter Configuration: Carefully review the configuration settings for each task involved (Open Camera, Upload Media, etc.). Ensure all parameters are defined correctly.
-
Incorrect Request Body & Response Parameters: Verify that the parameters used within vDesigner tasks (request body and response) are accurate and match the API specifications.
-
Incorrect Path for the Response: Double-check that the path specified in vDesigner-2.0 tasks to capture the response from the vConnect service is accurate.
- Conclusion
8.1 Alternative Use Cases
- The DMS service offers functionalities beyond camera capture and upload scenarios. You can achieve other use cases such as selecting a file using the “File Picker” task, uploading it to the server, and then fetching it again.
- Upcoming use cases related to DMS will be shared soon.
4 Likes