How to add template driven forms in your angular app
2 Likes
Angular supports two design approaches for interactive forms. You can build forms by using Angular and directives to write templates with the form-specific directives. This tutorial describes the directives and techniques to use when writing templates. You can also use a reactive or model-driven approach to build forms
Template-driven forms are suitable for small or simple forms, while reactive forms are more scalable and suitable for complex forms. For a comparison of the two approaches, see Angular
Template-driven forms in Angular provide a simple way to manage forms using directives in the template. Here’s a step-by-step guide to creating a basic template-driven form:
Step 1: Create a New Angular Project: If you haven’t already, create a new Angular project using the Angular CLI:
ng new template-driven-form-demo
cd template-driven-form-demo
Step 2: Create a Form Component: Generate a new component where your form will reside:
ng generate component form
Step 3: Import FormsModule in your respected Module:
import { FormsModule } from ‘@angular/forms’;
…
…
imports: [
** FormsModule**
]
Step 4: Create a class based Model for your Form:
export class Product {
name?: string;
email?: string;
constructor(name: string, email: string) {
this.name = name;
this.email = email;
}
}
Step 5: Design the Form in the Template: Edit the form.component.html file to create your template-driven form:
Template-Driven Form
<form #myForm="ngForm" (ngSubmit)="onSubmit(myForm)">
    <div class="mt-3">
        <label for="name">Name:</label>
        <input type="text" class="form-control" id="name" name="name" [(ngModel)]="product.name" required>
    </div>
    <div class="mt-3">
        <label for="email">Email:</label>
        <input type="email" class="form-control" id="email" name="email" [(ngModel)]="product.email" required email>
    </div>
    <button type="submit" class="btn btn-primary mt-3">Submit</button>
</form>

<p class="pt-5">
    {{product | json}}
</p>
Step 6: Implement Form Handling in the Component: Edit the form.component.ts file to implement form handling:
import { Component, OnInit } from ‘@angular/core’;
import { Product } from ‘./add-edit-product-model’;
@Component({
selector: ‘app-form’,
templateUrl: ‘./form.html’,
styleUrls: [‘./form.scss’]
})
export class AddEditProductComponent implements OnInit {
product: Product = {};
constructor() { }
ngOnInit(): void {
}
onSubmit(form: any) {
if (form.valid) {
console.log(‘Form submitted with values:’, form.value);
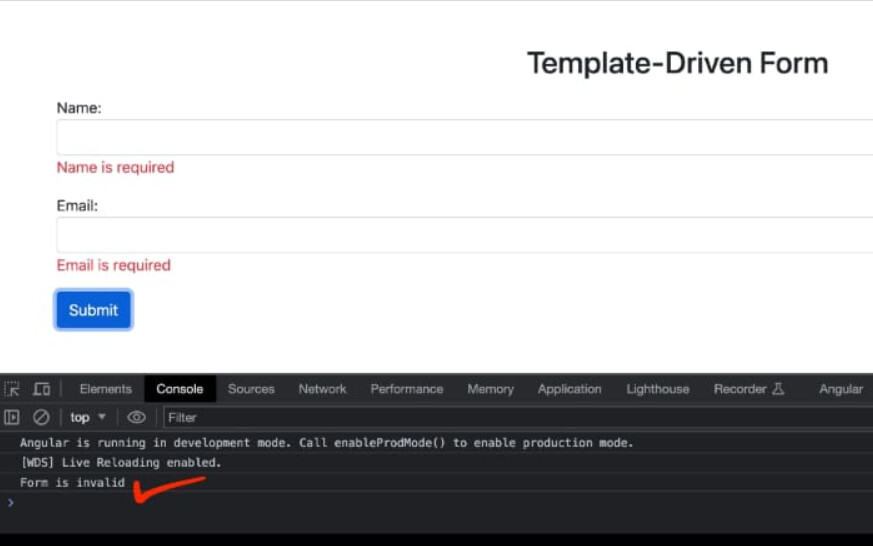
} else {
console.log(‘Form is invalid’);
}
}
}
Step 7: Add Form Validation Messages: Enhance the user experience by displaying validation messages:
Template-Driven Form
<form #myForm="ngForm" (ngSubmit)="onSubmit(myForm)">
    <div class="mt-3">
        <label for="name">Name:</label>
        <input type="text" class="form-control" id="name" name="name" #name="ngModel" [(ngModel)]="product.name" required>

        <span class="text-danger" *ngIf="(name.touched || myForm.submitted) && name.errors?.required">
            Name is required
        </span>
    </div>
    <div class="mt-3">
        <label for="email">Email:</label>
        <input type="email" class="form-control" id="email" name="email" #email="ngModel" [(ngModel)]="product.email" required email>

        <span class="text-danger" *ngIf="(email.touched || myForm.submitted) && email.errors?.required">
            Email is required
        </span>
    </div>
    <button type="submit" class="btn btn-primary mt-3">Submit</button>
</form>

<p class="pt-5">
    {{product | json}}
</p>
Step 8: Include the Form Component in Your App: Edit the app.component.html to include the form component:
Step 9: Run Your Angular App: Start your Angular development server and see the form in action:
ng serve
Visit http://localhost:4200 in your browser to interact with your template-driven form.
Some Snapshots of working App with Template Driven Forms

Template Driven form without validation
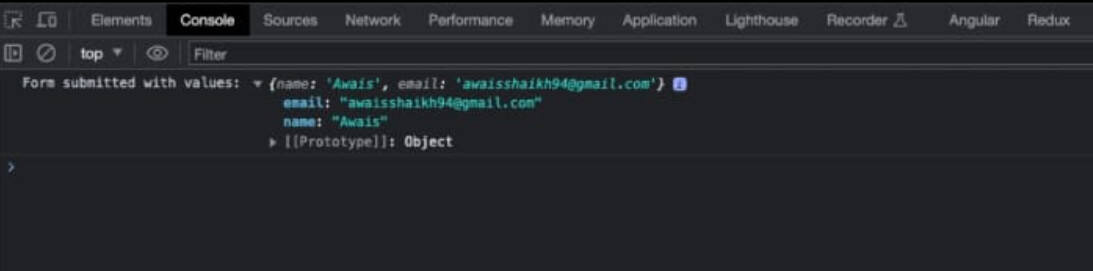
Template driven forms without validation - showing logs in dev tools onSubmit click
3 Likes