Architecture of angular in a simple way
3 Likes

Angular is a popular open-source framework for building web and mobile applications. It follows the Model-View-Controller (MVC) architectural pattern and provides a structured approach to creating dynamic and responsive applications.
The architecture diagram identifies the eight main building blocks of an Angular application:
1. Components
The basic building block of an angular application is a component. A component encapsulates the user interface, logic and data related to a specific part of the application.
A component controls a patch of screen called a view.
For example, the following views are controlled by components:
- The app root with the navigation links.
- The list of heroes.
- The hero editor.
You define a component’s application logic—what it does to support the view—inside a class. The class interacts with the view through an API of properties and methods.
For example, this HeroListComponent has a heroes property that returns an array of heroes that it acquires from a service. HeroListComponent also has a selectHero() method that sets a selectedHero property when the user clicks to choose a hero from that list.
src/app/hero-list.component.ts (class)
export class HeroListComponent implements OnInit {
heroes: Hero;
selectedHero: Hero;
constructor(private service: HeroService) { }
ngOnInit() {
this.heroes = this.service.getHeroes();
}
selectHero(hero: Hero) { this.selectedHero = hero; }
}`
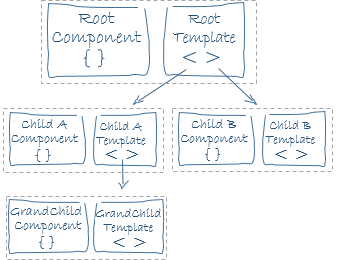
Angular creates, updates, and destroys components as the user moves through the application
- Templates
Each angular component has an associated HTML template that defines the structure of the user interface. The template can include HTML markup, Angular directives, and bindings to display dynamic data
A template looks like regular HTML, except for a few differences. Here is a template for our HeroListComponent:
src/app/hero-list.component.html
Hero List
Pick a hero from the list
- {{hero.name}}
Although this template uses typical HTML elements like <h2> and <p>, it also has some differences. Code like *ngFor, {{hero.name}}, (click), [hero], and <hero-detail> uses Angular’s template syntax.
In the last line of the template, the <hero-detail> tag is a custom element that represents a new component, HeroDetailComponent.
The HeroDetailComponent is a different component than the HeroListComponent you’ve been reviewing. The HeroDetailComponent (code not shown) presents facts about a particular hero, the hero that the user selects from the list presented by the HeroListComponent. The HeroDetailComponent is a child of the HeroListComponent.
Notice how <hero-detail> rests comfortably among native HTML elements. Custom components mix seamlessly with native HTML in the same layouts.
- Styles:
Components can have associated CSS styles to define the appearance and layout of the user interface. These styles are scoped to the component, preventing global style conflicts.
- Logic:
typescript code is used to define the component’s behavior and business logic. This includes event handling, data manipulation, and interaction with services
**
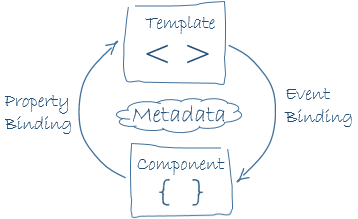
- Metadata:
Angular components are decorated with metadata using the @Component decorator. Metadata includes information such as the component’s selector, template, styles and more.
![]()
In fact, HeroListComponent really is just a class. It’s not a component until you tell Angular about it.
To tell Angular that HeroListComponent is a component, attach metadata to the class.
In TypeScript, you attach metadata by using a decorator. Here’s some metadata for HeroListComponent:
src/app/hero-list.component.ts (metadata)
@Component({
selector: ‘hero-list’,
templateUrl: ‘./hero-list.component.html’,
providers: [ HeroService ]
})
export class HeroListComponent implements OnInit {
/* . . . */
}`
Here is the @Component decorator, which identifies the class immediately below it as a component class.
The @Component decorator takes a required configuration object with the information Angular needs to create and present the component and its view.
Here are a few of the most useful @Component configuration options:
-
selector: CSS selector that tells Angular to create and insert an instance of this component where it finds a<hero-list>tag in parent HTML. For example, if an app’s HTML contains<hero-list></hero-list>, then Angular inserts an instance of theHeroListComponentview between those tags. -
templateUrl: module-relative address of this component’s HTML template, shown above. -
providers: array of dependency injection providers for services that the component requires. This is one way to tell Angular that the component’s constructor requires aHeroServiceso it can get the list of heroes to display.

The metadata in the @Component tells Angular where to get the major building blocks you specify for the component.
The template, metadata, and component together describe a view.
Apply other metadata decorators in a similar fashion to guide Angular behavior. @Injectable, @Input, and @Output are a few of the more popular decorators.
2. Modules:

Angular apps are modular and Angular has its own modularity system called Angular modules or NgModules.
Every Angular app has at least one Angular module class, the root module,
conventionally named AppModule.
- NgModule
Angular applications are organized into modules using the @NgModule decorator. A module is a container for related components, services and other application features. Modules help with organization, encapsulation and lazy loading
The most important properties are:
declarations- the view classes that belong to this module. Angular has three kinds of view classes: components, directives, and pipes.exports- the subset of declarations that should be visible and usable in the component templates of other modules.imports- other modules whose exported classes are needed by component templates declared in this module.providers- creators of services that this module contributes to the global collection of services; they become accessible in all parts of the app.bootstrap- the main application view, called the root component, that hosts all other app views. Only the root module should set thisbootstrapproperty.
import { NgModule } from ‘@angular/core’;
import { BrowserModule } from ‘@angular/platform-browser’;
@NgModule({
imports: [ BrowserModule ],
providers: [ Logger ],
declarations: [ AppComponent ],
exports: [ AppComponent ],
bootstrap: [ AppComponent ]
})
export class AppModule { }
-
Declarations
In and NgModule, you declare the components that belong to that nodule. -
Providers
You can configure providers in an NgModule to make services available for dependency injection. Providers define how instances of services are created and shared across components.
3. Services

Services are reusable classes that provide functionality and data to various parts of an application. Services are typically used to centralize data access, HTTP requests, state management.
Examples include:
- logging service
- data service
- message bus
- tax calculator
- application configuration
Here’s an example of a service class that logs to the browser console:
src/app/logger.service.ts (class)
export class Logger {
log(msg: any) { console.log(msg); }
error(msg: any) { console.error(msg); }
warn(msg: any) { console.warn(msg); }
}
Here’s a HeroService that uses a Promise to fetch heroes. The HeroService depends on the Logger service and another BackendService that handles the server communication grunt work.
src/app/hero.service.ts (class)
export class HeroService {
private heroes: Hero = ;
constructor(
private backend: BackendService,
private logger: Logger) { }
getHeroes() {
this.backend.getAll(Hero).then( (heroes: Hero) => {
this.logger.log(Fetched ${heroes.length} heroes.);
this.heroes.push(…heroes); // fill cache
});
return this.heroes;
}
}
Dependency injection

Angular’s built in Dependency injection system is used to provide instances of service to components. This makes it easier to share data and functionality across different parts of an application while promoting modularity and testability.
4. Routing
-
Router
Angular’s Router module provides a way to implement navigation and routing in a single-page application (SPA). It maps URLs to specific components and allows users to navigate between views without full-page reloads -
Route Configuration:
Developers define route configurations that specify which component should be displayed for each URL. Route guards can also be used to control access to routes based on user authentication and other criteria.
5. Data flow and state management:
Data binding
Without a framework, you would be responsible for pushing data values into the HTML controls and turning user responses into actions and value updates. Writing such push/pull logic by hand is tedious, error-prone, and a nightmare to read as any experienced jQuery programmer can attest.
Angular supports data binding, a mechanism for coordinating parts of a template with parts of a component. Add binding markup to the template HTML to tell Angular how to connect both sides.
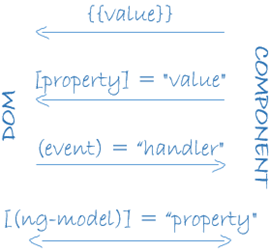
As the diagram shows, there are four forms of data binding syntax. Each form has a direction — to the DOM, from the DOM, or in both directions.
The HeroListComponent example template has three forms:
src/app/hero-list.component.html (binding)
- The
{{hero.name}}interpolation displays the component’shero.nameproperty value within the<li>element. - The
[hero]property binding passes the value ofselectedHerofrom the parentHeroListComponentto theheroproperty of the childHeroDetailComponent. - The
(click)event binding calls the component’sselectHeromethod when the user clicks a hero’s name.
Two-way data binding is an important fourth form that combines property and event binding in a single notation, using the ngModel directive. Here’s an example from the HeroDetailComponent template:
src/app/hero-detail.component.html (ngModel)
<input [(ngModel)]=“hero.name”>
In two-way binding, a data property value flows to the input box from the component as with property binding. The user’s changes also flow back to the component, resetting the property to the latest value, as with event binding.
Angular processes all data bindings once per JavaScript event cycle, from the root of the application component tree through all child components.
Data binding plays an important role in communication between a template and its component.
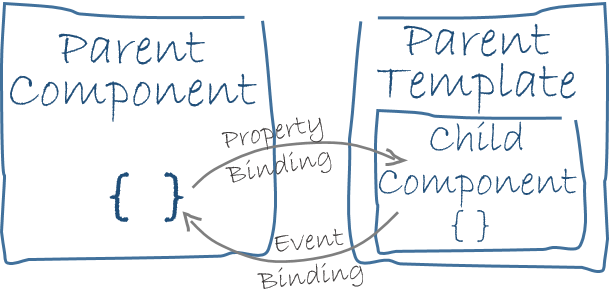
Data binding is also important for communication between parent and child components.
- RxJS:
Angular leverages RxJS (Reactive Extensions for JavaScript) to handle asynchronous operations, such as HTTP requests and event handling. Observables are used to work with asynchronous data streams.
- State Management (Optional):
For complex applications, developers often use state management libraries like NgRx to manage application state and data flow. This helps maintain a predictable and scalable architecture.
3 Likes